How to send pictures on Microsoft Teams
In today's interconnected workplace, effective communication and seamless collaboration are paramount. Microsoft Teams, the widely embraced communication platform, provides professionals with a versatile and intuitive space to connect, share ideas, and foster teamwork. While Teams is renowned for its robust chat and video conferencing capabilities, it's also an excellent tool for sharing visual content. In this blog post, we'll explore how you can easily send pictures on Microsoft Teams, empowering you and your colleagues to exchange visuals, provide feedback, and enhance collaboration with utmost convenience. Let's dive in and discover the power of visual communication within the Teams ecosystem.
Send pictures on Microsoft Teams: 6 Steps
Step 1: Open the Microsoft Teams App - Launch the Microsoft Teams application on your device.
- Ensure you have a stable internet connection for seamless communication.

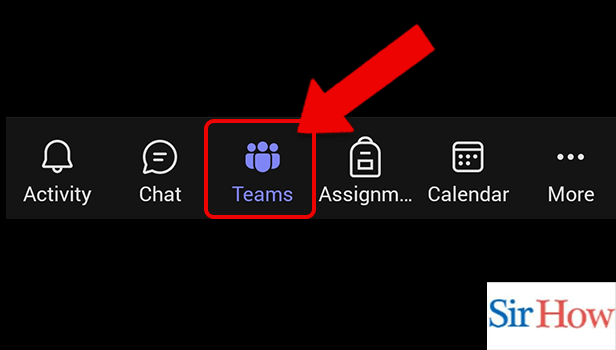
Step 2: Tap on teams icon - Tap on the Teams icon located in the navigation bar at the bottom of the screen.
- Select the team or channel where you want to send the pictures.

Step 3: Tap on general - Within the selected team, locate and tap on the "General" channel.
- This channel serves as the default communication hub for general discussions and announcements.
Step 4: Tap on write message icon - To initiate a new message, tap on the "Write message" icon located at the bottom of the screen.
- This will open the message input field, allowing you to compose your message and attach pictures.

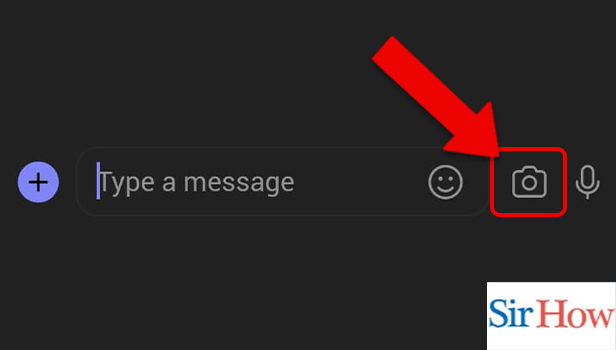
Step 5: Tap on camera icon - To add pictures, tap on the camera icon located in the message input field.
- Depending on your device, you'll have the option to either take a photo using the camera or select an image from your photo library.
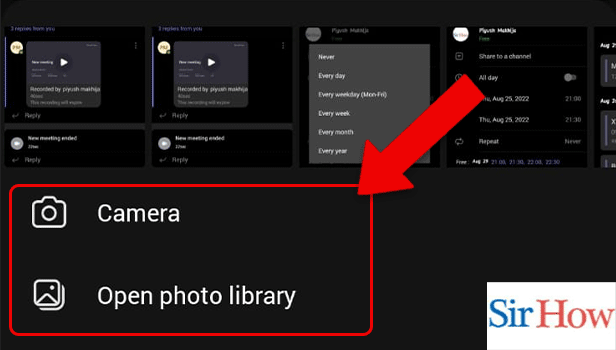
Step 6: Tap on camera/open photo library and choose photos - After tapping on the camera icon in the message input field, you will have the option to either capture a photo using your device's camera or choose an image from your photo library.
- If you want to take a photo, tap on the camera icon again, align the subject within the frame, and tap the capture button.
- To select an image from your photo library, tap on the "Photo Library" option. This will open your device's gallery, allowing you to browse and select the desired picture.
Microsoft Teams simplifies the process of sharing pictures, enabling seamless collaboration and communication within teams and channels. By following the above steps, you can effortlessly send pictures to your colleagues, promoting visual engagement and fostering a more productive work environment. Leverage the power of visual communication on Microsoft Teams to enhance your team's collaboration and achieve your goals effectively.
Tips
- Image Optimization: Before sending pictures on Microsoft Teams, optimize them by resizing or compressing the file size. This helps ensure faster upload and download speeds, as well as efficient use of storage space.
- Contextual Information: When sending pictures, provide context by including a brief description or explanation. This helps recipients understand the purpose or significance of the image, allowing for better collaboration and communication.
- Annotation and Markup: Microsoft Teams offers annotation and markup tools that allow you to highlight or annotate specific areas of the picture. Utilize these tools to draw attention to important details or provide additional information to enhance understanding.
FAQ
Keep File Sizes in Check:
Large image files can take longer to upload and may consume significant bandwidth.
Optimize your pictures by resizing or compressing them before sending to ensure faster transmission.
Provide Context and Clarity:
When sharing pictures, include a brief description or caption to provide context for your recipients.
Clearly communicate the purpose of the image or any specific details they should focus on.
Utilize Annotations and Markups:
Microsoft Teams offers built-in annotation tools that allow you to mark up images with drawings, arrows, text, and more.
Take advantage of these features to highlight important elements or provide additional explanations.