- add stories facebook
- create business facebook
- delete facebook post
- log out facebook
- create event facebook
- remove like facebook
- see friend request
- block ads0facebook
- view friends photos
- change language post
- manage posts facebook
- include feeling post
- watch most viewed
- include activity post
- view friend’s birthdays
- make avatar profile
- add music facebook
- add pictures post
- change background color
- remove tag facebook
- change account status
- find games facebook
- get featured games
- get fantasy games
- find live videos
- school facebook app
- check marketplace facebook app
- selling facebook app
- work facebook app
- mute stories facebook app
- acquaintance facebook app
- credit card facebook app
- hobbies facebook app
- access reels facebook app
- messenger facebook app
- add business facebook app
- public facebook app
- business facebook app
- sell facebook app
- remove pages facebook app
- unfriend facebook app
- cache facebook app
- find email facebook app
- quality facebook app
- refresh facebook app
- autoplay videos facebook app
- cancel poke facebook app
- reels facebook app
- insights facebook app
- view birthdays facebook app
- hide followers facebook app
- featured facebook app
- reaction facebook app
- video call facebook app
- gif facebook app
- remove friends facebook app
- call facebook app
- pokes facebook app
- pending requests facebook app
- sticker facebook app
- react facebook app
- likes page facebook app
- comment facebook app
- settings facebook app
- invites facebook app
- saved videos facebook app
- someone facebook app
- favorites facebook app
- archived facebook app
- albums on facebook app
- cancel request facebook app
- view stories facebook app
- add friends facebook app
- facebook app chrome
- added friends facebook app
- pin facebook app
- how to add a website to the facebook app
- how to access trash on facebook app
- clear history facebook app
- inbox facebook app
- bio facebook app
- remove photos facebook app
- birthdays facebook app
- pinned facebook app
- facebook app data
- archive facebook app
- photos on facebook app
- birthday on facebook app
- request sent facebook
- groups facebook app
- login facebook app
- activity facebook app
- stories facebook app
- access videos facebook app
- gender facebook app
- information facebook app
- shortcut facebook app
- event facebook app
- page name facebook app
- change name facebook app
- email facebook app
- limit facebook app
- picture facebook app
- family facebook app
- devices facebook app
- message facebook app
- how to access playlist in the facebook app
- games facebook app
- autoplay facebook app
- archived chats facebook app
- update facebook app
- get facebook app
- go offline facebook app
- nickname facebook app
- birthday facebook app
- notification facebook app
- description facebook app
- group on facebook app
- name facebook app
- videos facebook app
- photos facebook app
- password facebook app
- remove photo facebook app
- likes facebook app
- friendship facebook app
- cover photo facebook app
- status facebook app
- how to change email address on facebook app
- poke facebook app
- mute facebook app
- friends facebook app
- history facebook app
- followers facebook app
- pictures facebook app
- post link facebook app
- albums facebook app
- group facebook app
- friends list facebook app
- profile facebook app
- page facebook app
- post page facebook app
- block ads facebook app
- photo album facebook
- comment yourself facebook
- check box on facebook
- change photo privacy facebook
- delete page facebook
- change avatar facebook
- unblock someone facebook
- switch accounts facebook
- delete facebook app
- activity status facebook
- change name facebook
- past memories facebook
- delete account facebook
- create group facebook
- go live facebook
- change language facebook
- turn off sounds facebook
- post on facebook
- block on facebook
- dark mode facebook
- blocked list facebook
- comments facebook app
- profile private facebook
- see friends facebook
- search someone facebook
- search history facebook app
- clear cookie facebook
- marketplace facebook app
- download fb app on iphone
- change fb name on iphone
- log out fb account on iphone
- save video on fb on iphone
- unblock someone on fb on iphone
- save video from fb to iphone
- delete fb on iphone
- update fb on iphone
- clear fb cache on iphone
- get the fb mkt icon in shortcuts on iphone
- lock fb profile on iphone
- delete a fb page on iphone
- find drafts in fb on iphone
- turn off fb tracking on iphone
- change email on fb on iphone
- see memories on fb on iphone
- upload photos to fb album on iphone
- find saved posts on fb on iphone
- turn off autoplay videos on fb on iphone
- add music to fb story on iphone
- flip fb live video on iphone
- post multiple photos on fb on iphone
- refresh fb on iphone
- see whom you follow on fb on iphone
- turn off captions fb iphone
- create a fb group on iphone
- create a private event on fb on iphone
- find activity log on fb
- create event on fb on iphone
- add fb to home screen on iphone
- switch fb accounts on iphone
- add another fb account on iphone
- log in to fb on iphone
- tag people in fb post on iphone
- post on fb on iphone
- go live on fb on iphone
- change fb password on iphone
- delete fb account on iphone
- deactivate fb account on iphone
- hide friends from fb profile
- delete facebook story
- change fb profile picture iphone
- turn off fb active status iphone
- make facebook avatar iphone
- make poll on facebook iphone
- make photo fit fb iphone
How to Add Business to the Facebook App
A Facebook Business Page is a public profile created for the purpose of self-promotion by companies, organizations, and public figures. It is easy to Add Business to the Facebook App by going into the "additional info" section of your payments. This article will guide you further on how to do it.
Add Business Through Settings:
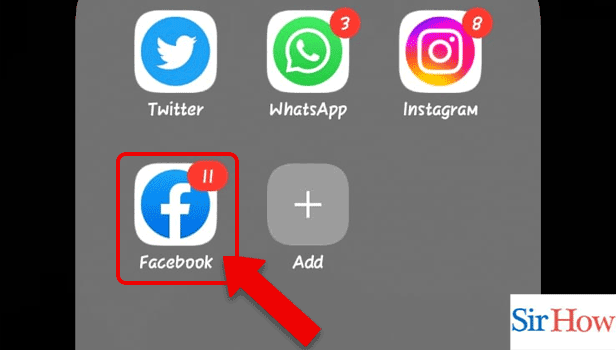
Step 1: Open the Facebook app: Tap and open the Facebook application as the first step in this process.
- Take the help of the search option to find your Facebook application on your mobile.
- Search for the application on Play Store and install it if it is not present on your mobile.
- Make sure you have an internet connection.
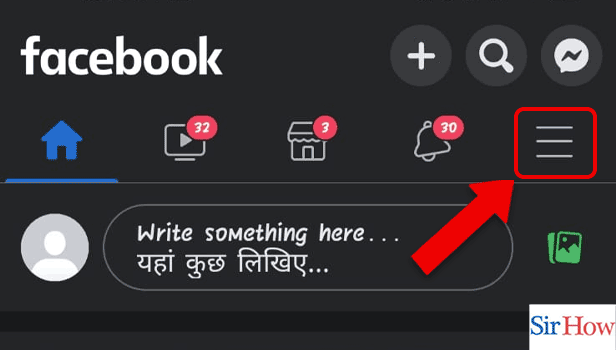
Step 2: Tap on the 3 lines: After that, tap on the menu icon, also called the three-line icon. For your convenience, an image is provided below.
- The option is present inside the Facebook application.
- You can find the icon in the above portion.
- The arrow in the picture indicates the icon of three lines.
- Turn on dark mode in the Facebook app if needed at night.
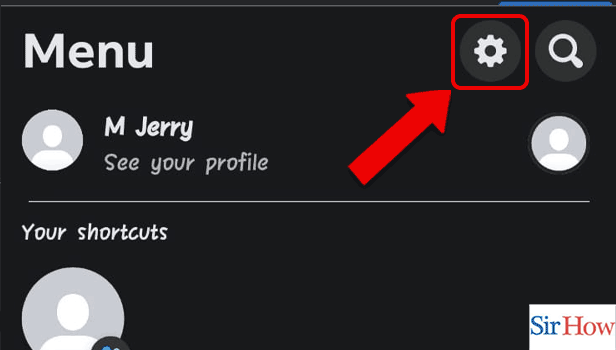
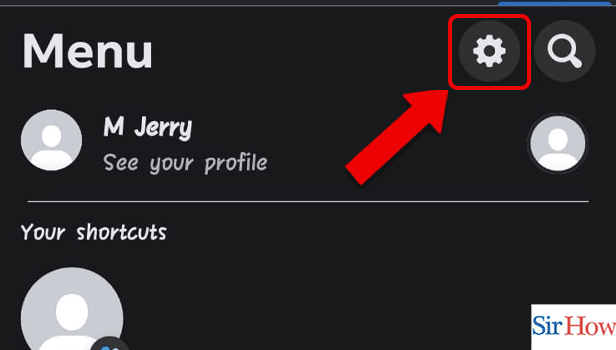
Step 3: Tap on the Settings icon: Thirdly, tap on the settings icon to go into the payment settings.
- You will get the icon at the right corner just above your profile option.
- There are many options available on Menu by which you go directly into a particular setting.
- See the image to understand the step easily.
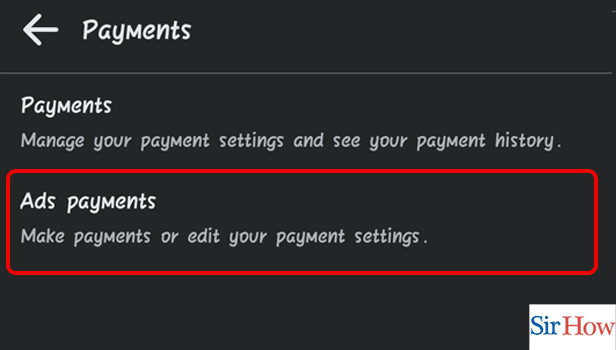
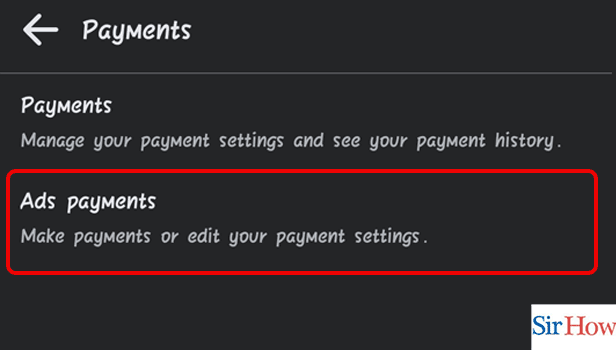
Step 4: Tap on Ads payments: Fourthly, you have to tap on the second option. The second option is Ads payments.
- After going into the settings, you have to scroll down and find out the payments section.
- After that, you will get two options.
- Click on the second one as shown in the picture attached below.
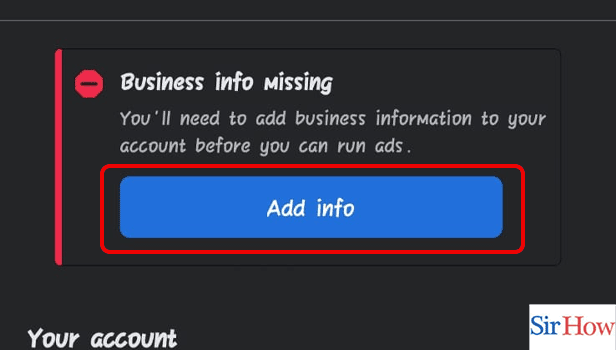
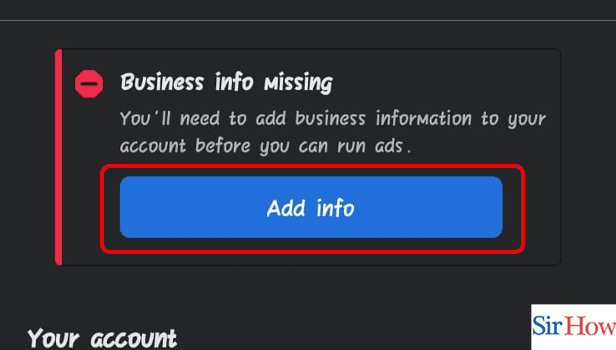
Step 5: Tap on Add info: After that, you have to click on Add info option available under the icon 'Business info missing'.
- You will get the option at first.
- A sentence will be visible to you which is "Business info missing'.
- Tap on the option in blue which is Add info icon.
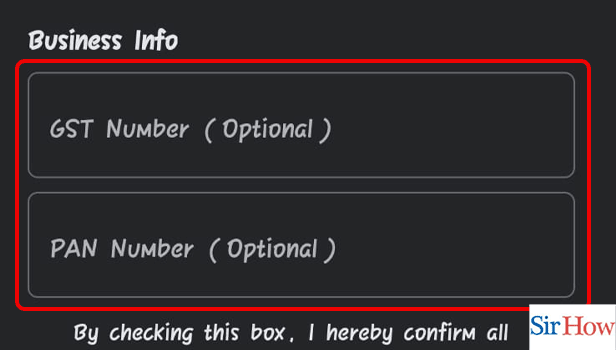
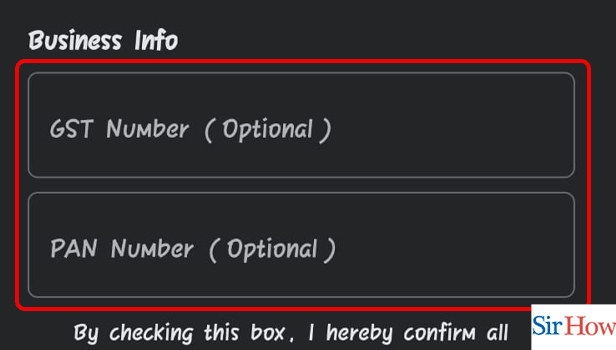
Step 6: Add the information: Moreover, after clicking the "additional information" option, you will get two options to fill out. The options are GST number and PAN number.
- Fill in both options.
- See the options in the given image in red color.
- The information is optional because if someone doesn't want to disclose their information, they have the option of not adding it.
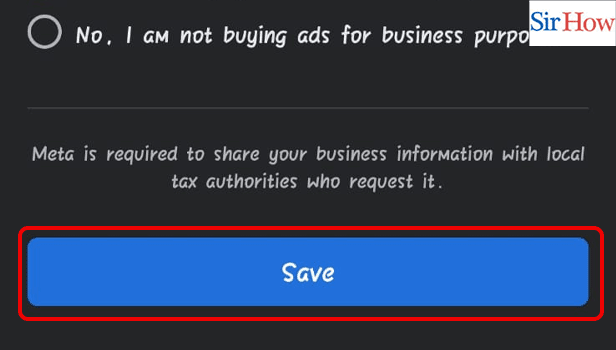
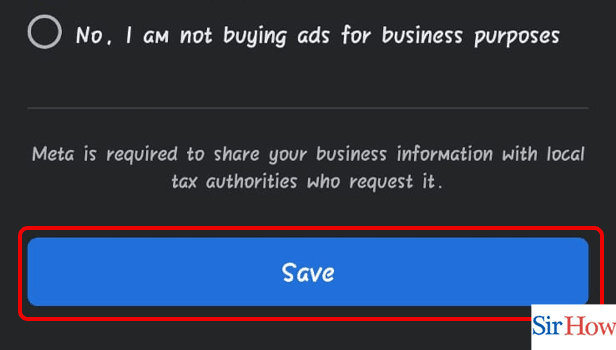
Step 7: Tap on Save: Lastly, tap on the Save option to complete the process.
- You will get the Save option after filling in the information asked for.
- Make sure you click on the Save icon to save it permanently.
- Double-check the information before clicking the Save option.
Add Business Through Search:
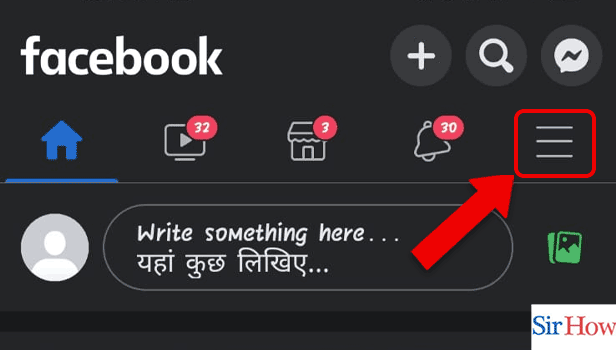
Step 1: Tap on the 3 lines: Firstly, you have to tap on the menu option present at the top.
- The 3 lines option is beside the notifications option at the top section.
- The icon is in the fifth position.
- Always have a look at the image attached after each step to make yourself clear.
You have the option to switch Facebook accounts on your iPhone if needed.
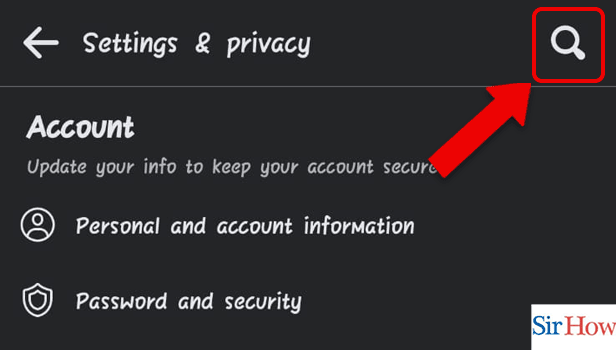
Step 2: Tap on the Settings icon: Secondly, select the settings icon from the side of the search option. The settings icon is available from the menu icon.
- After going into the Menu, you have to look right.
- There you can see a small shaped icon called settings.
- Tap on it to change your account's user settings.
Additionally, you can clear cookies on the Facebook app by going into the settings.
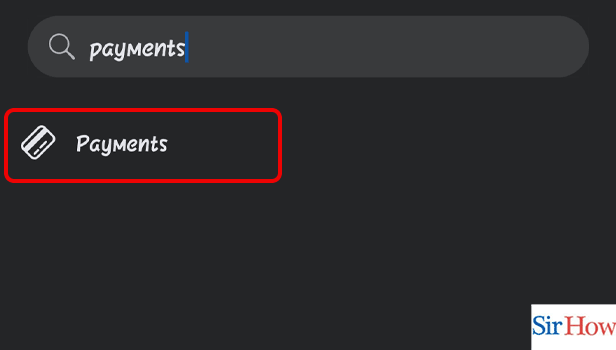
Step 3: Search for the Payments: Thirdly, you have to type the word 'payments' and click on the search button to find it.
- You have to type through your keyboard.
- Make sure you tap on the search option after writing the name.
- Follow the picture to understand the location of the search icon.
Step 4: Tap on Payments: Fourthly, you have to click on payments. After that, you will be redirected to the payment section.
- It is easy to find the payment icon with the help of the search option.
- A Search option is given to make your work easy.
- You can search any type of settings and go directly into that with the help of this search icon.
Step 5: Tap on Ads payments: After that, select the Ads payments option.
- Through this icon, you can make payments or edit your payment settings.
- This is the main icon to change the settings of your payments.
- Choose the last option which is Ads payments.
Step 6: Tap on Add info: Tap on the Add info option because it will help you to add your GST and PAN number. The Add info option is highlighted with a blue color.
- Click on it.
- You can see your account balance.
Step 7: Add the information: After that, fill up the GST number and PAN number to add the information.
- Take out your PAN card and fill in the blank space.
- Write your GST number in the blank space.
Step 8: Tap on Save: Finally, after filling in all the information, tap on the save option. The save option helps you to store your information.
- Scroll down to get the Save option.
- Agree and tick mark the options before clicking the Save option.
Read the two methods correctly to know how to add a business to the Facebook app.
FAQs
How do I add my current company to Facebook?
You can add your current company to Facebook by going into the business assets section and then tapping on accounts.
Why doesn't my company appear on Facebook?
Your company doesn't appear on Facebook because of some technical glitches.
Why doesn't my Google My Business listing appear?
You haven't yet gone through the verification process, which is frequently the cause of your Google My Business listing not appearing in search results.
Can Facebook Business Manager be used on a mobile device?
Yes, it is accessible on a mobile device.
What Does It Cost to Have a Facebook Business Page?
A Facebook business page can be created and used for free, much like Facebook profiles and groups.
After reading the methods and the given FAQs, you will understand how to add a business to the Facebook app.
Related Article
- How to Find Archived Chats on the Facebook App
- How to Update the Facebook App
- How to Get the Facebook App
- How to Go Offline on Facebook App
- How to Remove Nickname on Facebook App
- How to Hide Birthday on Facebook App
- How to Get Rid of Messenger Notification in Facebook App
- How to Edit Group Description on Facebook App
- How to Leave a Group on Facebook App
- How to Add Another Name in Facebook App
- More Articles...