- add stories facebook
- create business facebook
- delete facebook post
- log out facebook
- create event facebook
- remove like facebook
- see friend request
- block ads0facebook
- view friends photos
- change language post
- manage posts facebook
- include feeling post
- watch most viewed
- include activity post
- view friend’s birthdays
- make avatar profile
- add music facebook
- add pictures post
- change background color
- remove tag facebook
- change account status
- find games facebook
- get featured games
- get fantasy games
- find live videos
- school facebook app
- check marketplace facebook app
- selling facebook app
- work facebook app
- mute stories facebook app
- acquaintance facebook app
- credit card facebook app
- hobbies facebook app
- access reels facebook app
- messenger facebook app
- add business facebook app
- public facebook app
- business facebook app
- sell facebook app
- remove pages facebook app
- unfriend facebook app
- cache facebook app
- find email facebook app
- quality facebook app
- refresh facebook app
- autoplay videos facebook app
- cancel poke facebook app
- reels facebook app
- insights facebook app
- view birthdays facebook app
- hide followers facebook app
- featured facebook app
- reaction facebook app
- video call facebook app
- gif facebook app
- remove friends facebook app
- call facebook app
- pokes facebook app
- pending requests facebook app
- sticker facebook app
- react facebook app
- likes page facebook app
- comment facebook app
- settings facebook app
- invites facebook app
- saved videos facebook app
- someone facebook app
- favorites facebook app
- archived facebook app
- albums on facebook app
- cancel request facebook app
- view stories facebook app
- add friends facebook app
- facebook app chrome
- added friends facebook app
- pin facebook app
- how to add a website to the facebook app
- how to access trash on facebook app
- clear history facebook app
- inbox facebook app
- bio facebook app
- remove photos facebook app
- birthdays facebook app
- pinned facebook app
- facebook app data
- archive facebook app
- photos on facebook app
- birthday on facebook app
- request sent facebook
- groups facebook app
- login facebook app
- activity facebook app
- stories facebook app
- access videos facebook app
- gender facebook app
- information facebook app
- shortcut facebook app
- event facebook app
- page name facebook app
- change name facebook app
- email facebook app
- limit facebook app
- picture facebook app
- family facebook app
- devices facebook app
- message facebook app
- how to access playlist in the facebook app
- games facebook app
- autoplay facebook app
- archived chats facebook app
- update facebook app
- get facebook app
- go offline facebook app
- nickname facebook app
- birthday facebook app
- notification facebook app
- description facebook app
- group on facebook app
- name facebook app
- videos facebook app
- photos facebook app
- password facebook app
- remove photo facebook app
- likes facebook app
- friendship facebook app
- cover photo facebook app
- status facebook app
- how to change email address on facebook app
- poke facebook app
- mute facebook app
- friends facebook app
- history facebook app
- followers facebook app
- pictures facebook app
- post link facebook app
- albums facebook app
- group facebook app
- friends list facebook app
- profile facebook app
- page facebook app
- post page facebook app
- block ads facebook app
- photo album facebook
- comment yourself facebook
- check box on facebook
- change photo privacy facebook
- delete page facebook
- change avatar facebook
- unblock someone facebook
- switch accounts facebook
- delete facebook app
- activity status facebook
- change name facebook
- past memories facebook
- delete account facebook
- create group facebook
- go live facebook
- change language facebook
- turn off sounds facebook
- post on facebook
- block on facebook
- dark mode facebook
- blocked list facebook
- comments facebook app
- profile private facebook
- see friends facebook
- search someone facebook
- search history facebook app
- clear cookie facebook
- marketplace facebook app
- download fb app on iphone
- change fb name on iphone
- log out fb account on iphone
- save video on fb on iphone
- unblock someone on fb on iphone
- save video from fb to iphone
- delete fb on iphone
- update fb on iphone
- clear fb cache on iphone
- get the fb mkt icon in shortcuts on iphone
- lock fb profile on iphone
- delete a fb page on iphone
- find drafts in fb on iphone
- turn off fb tracking on iphone
- change email on fb on iphone
- see memories on fb on iphone
- upload photos to fb album on iphone
- find saved posts on fb on iphone
- turn off autoplay videos on fb on iphone
- add music to fb story on iphone
- flip fb live video on iphone
- post multiple photos on fb on iphone
- refresh fb on iphone
- see whom you follow on fb on iphone
- turn off captions fb iphone
- create a fb group on iphone
- create a private event on fb on iphone
- find activity log on fb
- create event on fb on iphone
- add fb to home screen on iphone
- switch fb accounts on iphone
- add another fb account on iphone
- log in to fb on iphone
- tag people in fb post on iphone
- post on fb on iphone
- go live on fb on iphone
- change fb password on iphone
- delete fb account on iphone
- deactivate fb account on iphone
- hide friends from fb profile
- delete facebook story
- change fb profile picture iphone
- turn off fb active status iphone
- make facebook avatar iphone
- make poll on facebook iphone
- make photo fit fb iphone
How to Change Videos Quality in Facebook App
Facebook has an enriched collection of videos. One can always refer to their quality enriched videos when they want to watch something that has good graphics and script. Viewing videos on Facebook isn't enough. You must know how to change videos quality in Facebook app. You can also save videos from Facebook on your iPhone or Android and view them later. So, it's important to know how to change videos quality on Facebook. To know more, keep reading.
5 simple steps to change the video quality in facebook
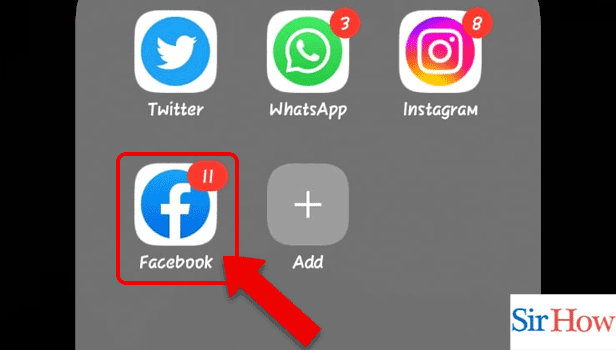
Step 1: Open the Facebook app: First, you have to open your Facebook app. You need to install the Facebook app from google play. After downloading the application, open it. After you have successfully opened the app, log in to your account.
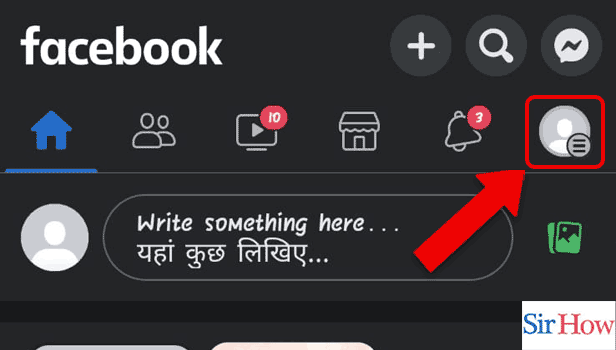
Step 2: Tap on the 3 lines: After you log in to your account, the main window will appear on your screen. Now, on the main screen, you will see 3 lines in the right upper corner of your screen. So, as you see it, tap on it.
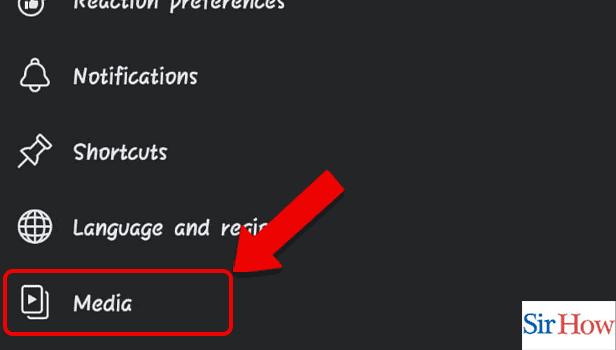
Step 3: Tap on the settings icon: Now, a menu bar will be visible on your screen. This menu bar will have 2 options, one is the setting and the second is the search bar. Now, tap on the settings icon.

Step 4: Tap on Media: As you tap on the settings option, you will see a list of options on your screen. Out of all these options, there would be a media option as well. Tap on the media option.
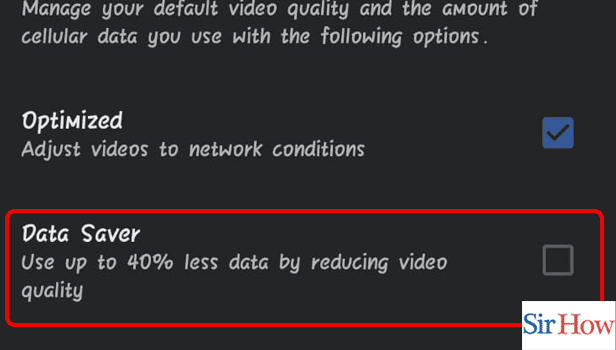
Step 5: Tap on Data Saver: As you tap on the media option, you will see a detailed line that speaks about the video quality and amount of cellular data that each video quality takes. Optimized is the first option and if you choose this option, it will adjust videos to the network conditions. You can also turn off autoplay videos on Facebook on your iPhone or Android to save your data.
Hence these are 5 simple steps that you have to follow if you want to change your Facebook video quality as you complete the above-mentioned steps, so your Facebook videos will automatically start playing with the quality you have set them on.
FAQs
Would there be any lag in the videos if you change the Facebook video quality?
No there would be no lag in the videos. Moreover, the only change would be in the video quality. The video quality will tend to get a bit low if you chose the data saver option and also the speed of the Facebook video will remain the same.
Will data be saved if the Facebook video quality is put on data saver mode?
Yes, a major amount of data would be saved if you go for the data saver options in the Facebook video quality.
Should one not choose the optimized option?
You can choose the optimized option only when you think the amount of data consumed by the videos is not a big matter for you. So, you can go for the optimized option.
Can changing video quality be done from the browser as well?
Yes, you can do it from a browser as well yet choosing the application is the best option.
Will the setting be permanent?
Yes, and the settings would be permanent until you make further changes to them.
Now, you can tune in to your favourite videos and you can adjust the quality of the videos as well. So start with our guide and set your video quality.
Related Article
- How to Copy Profile Link Facebook App
- How to Copy Page Link on Facebook App
- How to Post as a Page on Facebook App
- How to Block Ads on Facebook App
- How to Create a Photo Album on Facebook App
- How to Comment as Yourself on Facebook App
- How to Check Inbox on Facebook App
- How to Change Photo Privacy on Facebook App
- How to Delete Page in Facebook App
- How to Change Avatar on Facebook App
- More Articles...