- make group instagram
- make reel instagram
- download instagram reels
- upload instagram reel
- find saved reels
- save reel instagram
- delete reel instagram
- mute reels instagram
- add music instagram
- pause instagram reels
- add captions instagram
- hide likes instagram
- pin reel instagram
- see liked reels
- turn off reel
- find deleted reels
- watch instagram reels
- use multiple filters
- reset instagram reels
- get audio instagram
- share instagram reels
- see views instagram
- post video instagram
- add cover photo
- upload high quality
- add tags instagram
- flip camera instagram
- put instagram reels
- make reels instagram
- make reels private
- find specific reel
- allow others share
- pu reel instagram
- like instagram reel
- add collaborator instagram
- boost instagram reel
- block someone seeing
- limit comments instagram
- pin comment instagram
- adjust speed instagram
- add reel link
- connect instagram reels
- align instagram reels
- transitions on instagram
- turn off comments
- see friends reel
- remove audio instagram
- save instagram reels
- search filters instagram
- share saved reel
- get rid instagram
- post reel instagram
- invert photos iphone
- restrict user instagram
- report id instagram
- delete former texts
- change welcome message
- request download data
- send file instagram
- activate factor authentication
- add nba filter
- fast forward reels
- use holy bucks
- check profile insights
- add texts instagram
- find trending filters
- turn data saver
- change favorites list
- set reels timer
- mark reel interested
- add mentions instagram
- add hashtag story
- change fonts instagram
- hide message requests
- know that someone followed
- send voice note
- hide someone instagram
- request verification instagram
- turn activity status
- change duration instagram
- send instagram stories
- change email instagram
- get profile qr code
- view story reshares
- use vampire filter
- go live instagram
- use blue sky filter
- change group settings
- add links story
- add more photos
- create fake instagram
- instagram after posting
- crop reel instagram
- voiceover instagram reels
- comment instagram reels
- refresh instagram reels
- clips instagram reels
- tags instagram reels
- liked reels instagram
- friends instagram
- add poll instagram reel
- unlike reels instagram
- clips instagram reel
- fonts instagram reels
- reels posting
- instagram reel template
- posts on instagram
- deactivate instagram id
- music instagram stories
- business account instagram
- contacts on instagram
- edit friend list instagram
- view stories instagram
- unsave post/reel instagram
- followed someone instagram
- disable story sharing instagram
- add new faq instagram
- change theme instagram
- change language instagram
- configure message controls instagram
- hide posts from someone
- download reels instagram
- change password instagram
- change phone number instagram
- add polls to stories instagram
- blur instagram story
- see login activity instagram
- use celebrity look filter
- hide number likes views
- change avatar instagram
- mute reels on story
- delete instagram group
- previous comments instagram
- view recent stories instagram
- change mention setting
- change highlights name
- disable offensive comments
- change comments preference
- use bald filter
- ciao filter onstagram
- playboy bunny filter instagram
- random lives instagram
- face builder filter instagram
- change profile category instagram
- countdown instagram story
- clarendon filter instagram
- who unsend message instagram
- make heart on instagram story
- reduce sensitive content
- apply snow effect filter
- disable story archiving
- remix reels on instagram
- turn on story sharing
- apply euphoria filter
- turn off activity status
- use hearty eyes filter
- change stories toolbar position
- manually approve tags
- schedule an instagram live
- confirm mail on instagram
- add clock on instagram
- change e mail on instagram
- turn on advance comment
- change the color
- hear voice messages
- turn off commenting
- pin posts on instagram
- add a spotify playlist
- know if someone read
- add countdown instagram story
- see liked posts
- get your instagram profile
- pause reel on instagram
- link facebook to instagram
- turn off videos instagram
- reinstall instagram on iphone
- change instagram night mode
- turn off status instagram
- log out instagram devices
- enable instagram notifications iphone
- instagram get rid of posts
- add link to instagram bio
- create instagram group
- install instagram highlight covers
- set up an instagram page
- create instagram qr code
- delete instagram call history
- set up instagram story ads
- create instagram polls
- create instagram story questions
- add music instagram story
- switch multiple instagram accounts
- set up instagram live
- install instagram filters
- delete instagram chats
- delete an instagram post
- remove instagram group members
- delete instagram tags
- delete instagram groups
- edit instagram bio
- set up instagram highlight covers
- instagram creator account
- delete instagram highlights
- set up instagram bio
- create instagram story
- create instagram reels
- delete instagram story
- install instagram
- edit instagram photos
- post gif to instagram
- untag yourself instagram
- delete post instagram
- find friends instagram
- link instagram accounts
- logout all instagram
- share on instagram
- check blocked instagram
- message request on messenger
- search on instagram
- profile picture instagram
- delete comment instagram
- change instagram name
- disable comments on instagram
- clear history instagram
- remove followers instagram
- on/off notifications instagram
- edit instagram post
- logout instagram
- view instagram stories
- add location instagram
- youtube video instagram
- zoom on instagram
- multiple instagram accounts
- switch account instagram
- delete instagram profile
- instagram camera roll
- message on instagram
- link facebook instagram
- live on instagram
- stories on pc
- instagram on desktop
- tag someone instagram
- deactivate instagram account
- block someone instagram
- links in stories
- instagram stories
- download instagram stories
- private account
- post on instagram
- repost on instagram
- unblock friends
- change instagram email
- reset password
- save instagram videos
- save photos
- verify account
- delete account
- create account
How To Upload High Quality Reels on Instagram
If you're looking to increase your reach and engagement on Instagram, then you've probably heard of Reels - Instagram's latest feature for short-form videos. With the rise in popularity of Reels, it's become more important than ever to ensure that the content you're sharing is of the highest quality possible. In this blog post, we'll share some tips and tricks on how to upload high-quality Reels on Instagram, so that you can stand out in a sea of content and make the most out of this exciting new feature.
Upload High Quality Reels on Instagram: 6 Steps
Step 1: Open Instagram app - Make sure you have the latest version of the Instagram app installed on your phone.
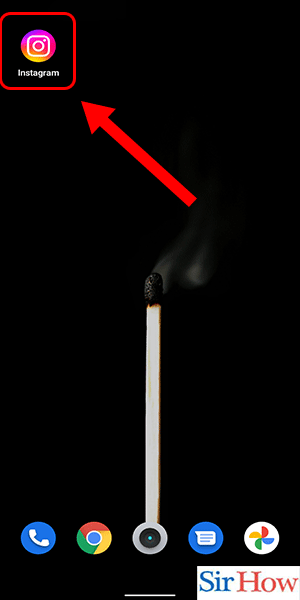
Step 2: Swipe right - Swipe right on your Instagram home screen to access the camera mode.
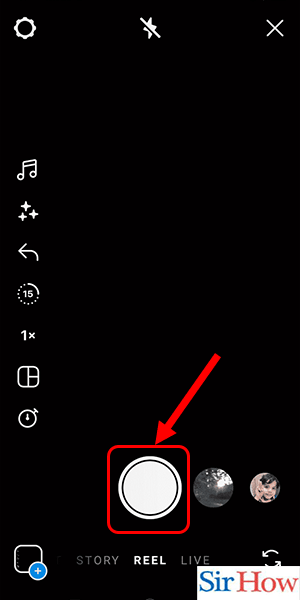
Step 3: Tap and hold to create reel - Tap and hold the center circle icon to start recording your Reel.
- Keep in mind that a high-quality Reel requires good lighting, steady hands, and clear audio.
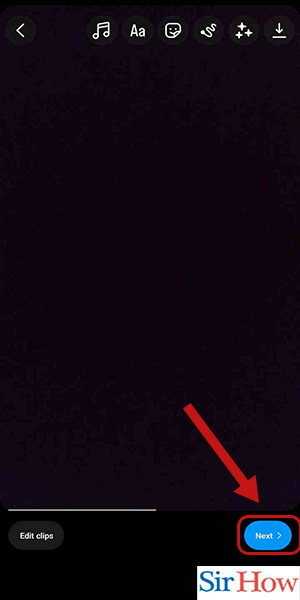
Step 4: Click 'next' - After recording your Reel, click ‘next’ to access editing options.
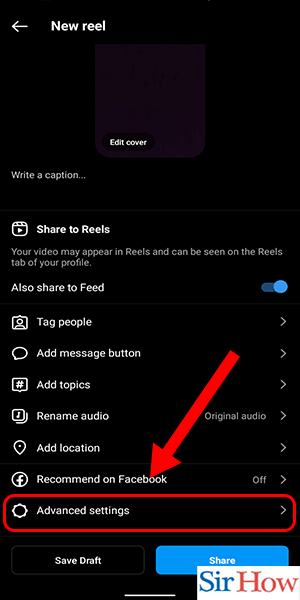
Step 5: Select 'advanced settings' - Scroll down and select ‘advanced settings’ at the bottom of the screen.
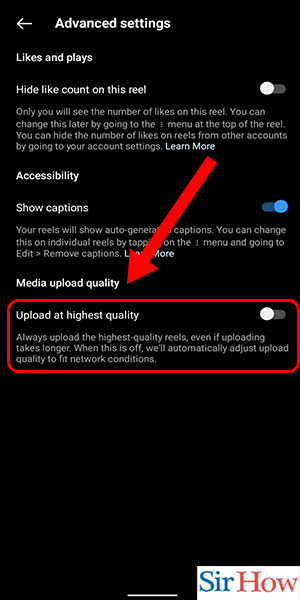
Step 6: Select 'upload at highest quality' - Make sure the ‘upload at highest quality’ option is toggled on.
- This will ensure that your Reel is uploaded in the highest quality possible.
Uploading high-quality Reels on Instagram is easy with just a few simple steps. By following these tips and using the ‘upload at highest quality’ option, you can ensure that your Reels stand out and get the attention they deserve. With the right lighting, steady hands, and clear audio, you can create engaging and high-quality content that will help you grow your following and increase your reach on Instagram.
Tips
- Use a high-quality camera: While most smartphones today have good cameras, using a professional camera can give you even better quality footage.
- Use a tripod or stabilizer: A tripod or stabilizer can help keep your camera steady and prevent shaky footage, resulting in a smoother, more professional-looking Reel.
- Pay attention to the lighting: Good lighting is crucial for high-quality footage. Try to film in natural light or invest in a ring light or other lighting equipment to make sure your Reel is well-lit.
- Focus on the audio: Audio quality is just as important as video quality. Make sure to use a microphone or capture audio in a quiet environment to avoid background noise or interference.
FAQ
- What is the maximum length of a Reel on Instagram?
- A Reel can be up to 60 seconds long.
- How do I add captions to my Reel?
- Tap on the ‘Add Caption’ option after recording your Reel to add captions.
- Can I edit my Reel after I’ve posted it?
- Yes, you can edit your Reel by clicking on the three dots in the top right corner of the Reel and selecting ‘edit’.
- Can I add music to my Reel?
- Yes, Instagram offers a wide range of music options that you can add to your Reel.
- Can I save my Reel to my camera roll?
- Yes, you can save your Reel to your camera roll by clicking on the download icon after posting it.
- How do I share my Reel on other social media platforms?
- Click on the share icon below your Reel and select the social media platform you want to share it on.
- How can I see the performance of my Reel?
- Go to your profile and click on the Reel to see the number of views, likes, and comments it has received.
Related Article
- How to request verification on Instagram
- How to turn off activity status on Instagram
- How to change duration of Instagram reels
- How to send Instagram stories to anyone
- How to change email on Instagram
- How to get profile QR code on Instagram
- How to view story reshares on Instagram
- How to Use Vampire Filter on Instagram
- How to go live on Instagram
- How to Use Blue Sky Filter on Instagram
- More Articles...