- make group instagram
- make reel instagram
- download instagram reels
- upload instagram reel
- find saved reels
- save reel instagram
- delete reel instagram
- mute reels instagram
- add music instagram
- pause instagram reels
- add captions instagram
- hide likes instagram
- pin reel instagram
- see liked reels
- turn off reel
- find deleted reels
- watch instagram reels
- use multiple filters
- reset instagram reels
- get audio instagram
- share instagram reels
- see views instagram
- post video instagram
- add cover photo
- upload high quality
- add tags instagram
- flip camera instagram
- put instagram reels
- make reels instagram
- make reels private
- find specific reel
- allow others share
- pu reel instagram
- like instagram reel
- add collaborator instagram
- boost instagram reel
- block someone seeing
- limit comments instagram
- pin comment instagram
- adjust speed instagram
- add reel link
- connect instagram reels
- align instagram reels
- transitions on instagram
- turn off comments
- see friends reel
- remove audio instagram
- save instagram reels
- search filters instagram
- share saved reel
- get rid instagram
- post reel instagram
- invert photos iphone
- restrict user instagram
- report id instagram
- delete former texts
- change welcome message
- request download data
- send file instagram
- activate factor authentication
- add nba filter
- fast forward reels
- use holy bucks
- check profile insights
- add texts instagram
- find trending filters
- turn data saver
- change favorites list
- set reels timer
- mark reel interested
- add mentions instagram
- add hashtag story
- change fonts instagram
- hide message requests
- know that someone followed
- send voice note
- hide someone instagram
- request verification instagram
- turn activity status
- change duration instagram
- send instagram stories
- change email instagram
- get profile qr code
- view story reshares
- use vampire filter
- go live instagram
- use blue sky filter
- change group settings
- add links story
- add more photos
- create fake instagram
- instagram after posting
- crop reel instagram
- voiceover instagram reels
- comment instagram reels
- refresh instagram reels
- clips instagram reels
- tags instagram reels
- liked reels instagram
- friends instagram
- add poll instagram reel
- unlike reels instagram
- clips instagram reel
- fonts instagram reels
- reels posting
- instagram reel template
- posts on instagram
- deactivate instagram id
- music instagram stories
- business account instagram
- contacts on instagram
- edit friend list instagram
- view stories instagram
- unsave post/reel instagram
- followed someone instagram
- disable story sharing instagram
- add new faq instagram
- change theme instagram
- change language instagram
- configure message controls instagram
- hide posts from someone
- download reels instagram
- change password instagram
- change phone number instagram
- add polls to stories instagram
- blur instagram story
- see login activity instagram
- use celebrity look filter
- hide number likes views
- change avatar instagram
- mute reels on story
- delete instagram group
- previous comments instagram
- view recent stories instagram
- change mention setting
- change highlights name
- disable offensive comments
- change comments preference
- use bald filter
- ciao filter onstagram
- playboy bunny filter instagram
- random lives instagram
- face builder filter instagram
- change profile category instagram
- countdown instagram story
- clarendon filter instagram
- who unsend message instagram
- make heart on instagram story
- reduce sensitive content
- apply snow effect filter
- disable story archiving
- remix reels on instagram
- turn on story sharing
- apply euphoria filter
- turn off activity status
- use hearty eyes filter
- change stories toolbar position
- manually approve tags
- schedule an instagram live
- confirm mail on instagram
- add clock on instagram
- change e mail on instagram
- turn on advance comment
- change the color
- hear voice messages
- turn off commenting
- pin posts on instagram
- add a spotify playlist
- know if someone read
- add countdown instagram story
- see liked posts
- get your instagram profile
- pause reel on instagram
- link facebook to instagram
- turn off videos instagram
- reinstall instagram on iphone
- change instagram night mode
- turn off status instagram
- log out instagram devices
- enable instagram notifications iphone
- instagram get rid of posts
- add link to instagram bio
- create instagram group
- install instagram highlight covers
- set up an instagram page
- create instagram qr code
- delete instagram call history
- set up instagram story ads
- create instagram polls
- create instagram story questions
- add music instagram story
- switch multiple instagram accounts
- set up instagram live
- install instagram filters
- delete instagram chats
- delete an instagram post
- remove instagram group members
- delete instagram tags
- delete instagram groups
- edit instagram bio
- set up instagram highlight covers
- instagram creator account
- delete instagram highlights
- set up instagram bio
- create instagram story
- create instagram reels
- delete instagram story
- install instagram
- edit instagram photos
- post gif to instagram
- untag yourself instagram
- delete post instagram
- find friends instagram
- link instagram accounts
- logout all instagram
- share on instagram
- check blocked instagram
- message request on messenger
- search on instagram
- profile picture instagram
- delete comment instagram
- change instagram name
- disable comments on instagram
- clear history instagram
- remove followers instagram
- on/off notifications instagram
- edit instagram post
- logout instagram
- view instagram stories
- add location instagram
- youtube video instagram
- zoom on instagram
- multiple instagram accounts
- switch account instagram
- delete instagram profile
- instagram camera roll
- message on instagram
- link facebook instagram
- live on instagram
- stories on pc
- instagram on desktop
- tag someone instagram
- deactivate instagram account
- block someone instagram
- links in stories
- instagram stories
- download instagram stories
- private account
- post on instagram
- repost on instagram
- unblock friends
- change instagram email
- reset password
- save instagram videos
- save photos
- verify account
- delete account
- create account
How To Adjust Speed on Instagram Reels
Adjust Speed on Instagram Reels and take your videos to the next level! Instagram Reels is a popular feature that allows users to create short, engaging videos that can be shared with their followers. One of the most powerful tools available in Reels is the ability to adjust the playback speed of your video. Whether you want to slow things down for a dramatic effect or speed things up for a fun and energetic vibe, adjusting the speed can help you create videos that stand out from the crowd. In this post, we'll explore how to adjust the speed on Instagram Reels and share some tips for making the most of this feature.
Adjust Speed on Instagram Reels: 4 Steps
Step 1: Open Instagram app - Make sure you have the latest version of the Instagram app installed on your device to access all the latest features, including the Reels speed adjustment.
- Check your internet connection before opening the app to avoid any lag or delay in loading the app.
- Make sure you have sufficient storage space on your device to save your edited Reels.
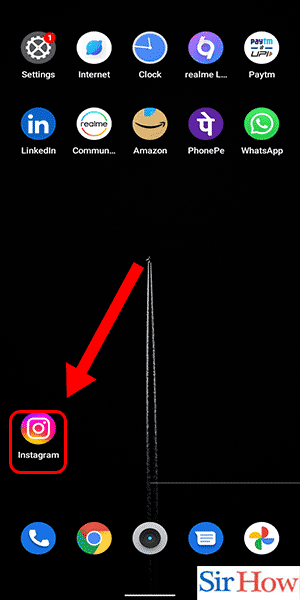
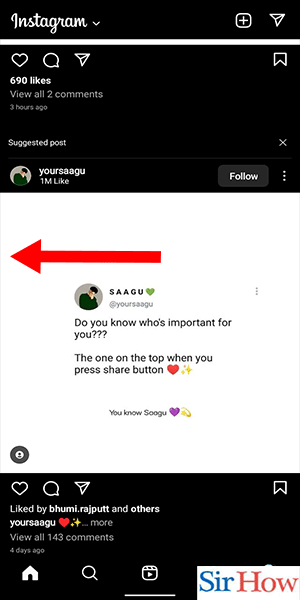
Step 2: Swipe right - Ensure that you are on the home screen of your Instagram account.
- Use your dominant hand for swiping right to access the Reels section quickly.
- Check out the Reels of other users for inspiration and ideas before creating your own.
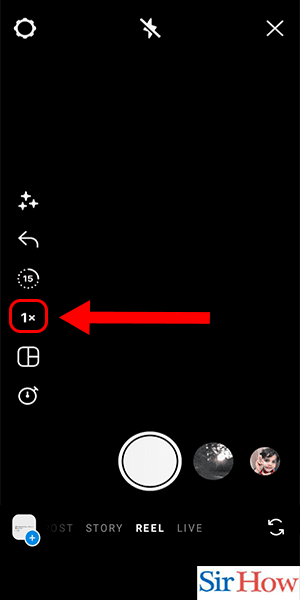
Step 3: Tap on speed icon - Look for the speed icon in the middle of the screen, between the audio and effects icons.
- Use your index finger to tap on the speed icon gently.
- Experiment with different speeds to find the one that works best for your Reel content.
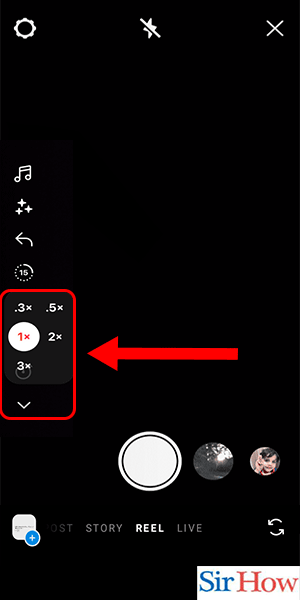
Step 4: Select the speed - The default speed is 1x, but you can increase or decrease it as per your preference.
- Choose a higher speed for fast-paced, action-oriented content, and a lower speed for slow-motion or dramatic content.
By following these simple steps and tips, you can easily adjust the speed of your Instagram Reels and create engaging content that resonates with your audience. Remember to experiment with different speeds and effects to make your Reel stand out and share it on various platforms to maximize its reach.
Tips
- When filming a Reel, try to keep the camera as steady as possible to prevent any unwanted movements that may affect the speed.
- Use transitions and special effects to enhance your Reel and make it more visually appealing.
- Always preview your Reel before sharing it to ensure that it looks and sounds the way you want it to.
FAQ
Q1. Can I adjust the speed of a Reel after I have shared it?
A1. No, once you have shared a Reel, you cannot adjust the speed. You will need to delete the Reel and start again.
Q2. How do I know which speed to use for my Reel?
A2. Experiment with different speeds to find the one that works best for your video. Consider the length of the video and the type of content you are sharing.
Q3. Can I adjust the speed of individual clips within a Reel?
A3. Yes, you can select specific clips within your Reel and adjust the speed for each one.
Q4. Will adjusting the speed of my Reel affect the quality of the video?
A4. Yes, when you adjust the speed of your Reel, the quality of the video may be affected. It’s important to preview.
Related Article
- How To Pin a Reel on Instagram
- How To See Liked Reels on Instagram
- How To Turn Off Reel Notifications on Instagram
- How To Find Deleted Reels on Instagram
- How To Watch Instagram Reels
- How To Use Multiple Filters on Instagram Reels
- How To Reset Instagram Reels
- How To Get Audio From Instagram Reels
- How To Share Instagram Reels To Facebook
- How To See Views on Instagram Reels
- More Articles...