- sirhow
- title case
- check huroob status
- check computer information
- delete snapchat messages
- profile picture microsoft teams
- redglitch filter instagram
- protect sheets amp ranges
- check passport status
- check cibil score online
- check android specs
- check computer age
- write article on sirhow
- celebrate eid
- career in writing
- help poor people
- help poor peoples
- use pocket wifi
- safe during earthquake
- watch live cricket
How to Protect Sheets & Amp Ranges
To maintain the confidentiality of your Google sheets file, it is important to protect sheets & amp ranges.
Sometimes, Google sheet my contain data which has to be kept private to yourself or the organization for which you're working. You have to keep the file safe to protect the data from theft. And for this, the best way is to Protect Sheets & Amp Ranges. You can also change permissions on Google sheets for this purpose.
oogle Sheets - Protect (Lock) Certain Cells, Ranges, Sheets, Formulas from Editing
Protect Sheets & Amp Ranges in 9 Steps
Step-1 Open Google Sheet in your Device: Okay! So, first toh have to open your device. And then, in your device just do the following to open your Google sheet:
- Tap on your web browser icon.
- Then, go to the search bar and enter the link of your Google sheet.
- Now, click on the 'Search' icon. It will open the sheet in a few seconds.

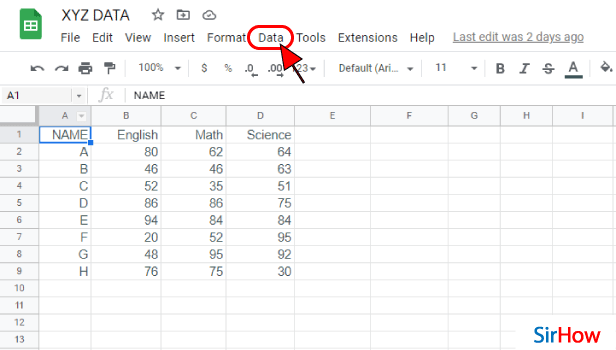
Step-2 Click On The 'Data' Tab: In the topmost bar of your sheet, you will find all the tabs that contain most of the options related to your Google sheet.
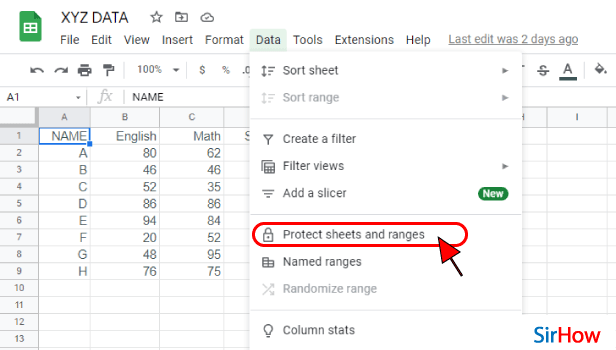
Step-3 Click on 'Protect sheets and ranges': In the 'Insert' tab, the sixth option is the option that says 'Protect sheets and ranges'.
You have to click on this option in your sheet in order to move further in this technique.
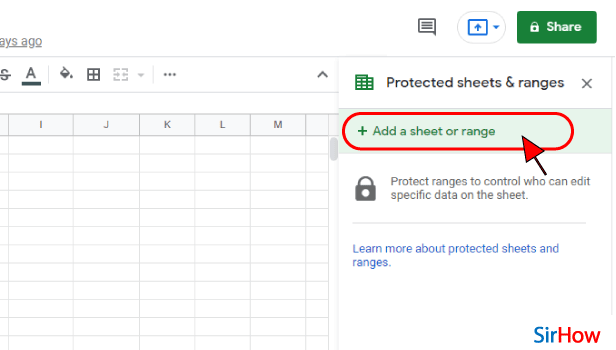
Step-4 Click on '+ Adds a Sheet or Range': A panel with the title 'Protected sheets & ranges' will now open up on the right side of your screen.
In this panel, you will find the option with a plus sign that has the title 'Add a sheet or Range'. Click on it.
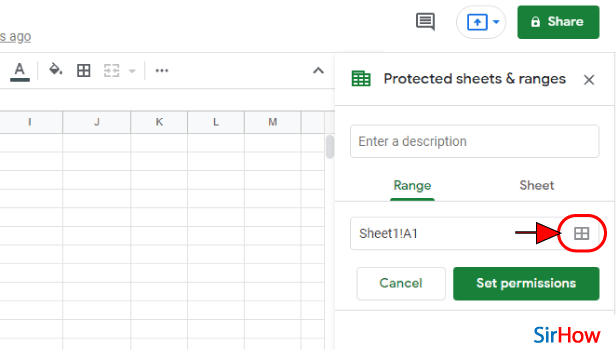
Step-5 Click Here to Protect Range: Now, on the right side of the tab where the name of your sheet is written, you will find a square icon with 4 sections as you can see in the picture below. Just click on this icon now.
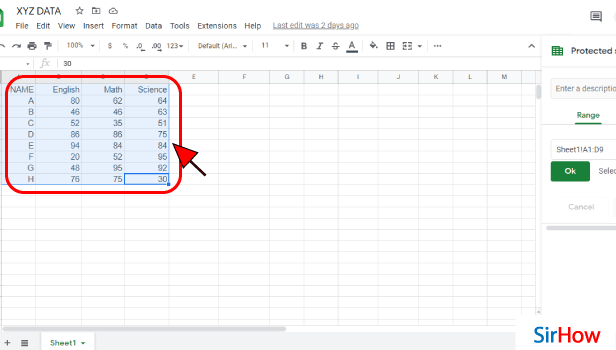
Step-6 Select The Range You Want to Protect: In this step, you have to select all the data or the range of data that you want to protect.
To select the data range, do the following:
- Tap and hold on a cell.
- Drag your mouse pointer to the data range you want to select until all the data is selected/ highlighted.
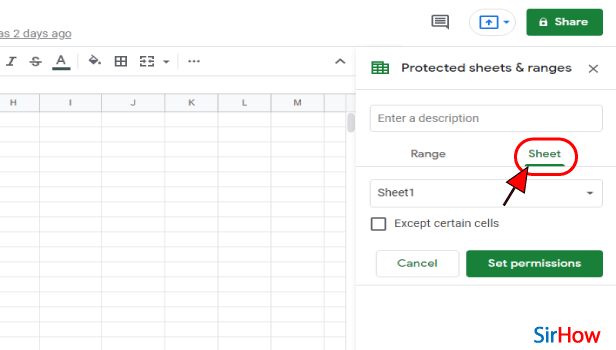
Step-7 Click On 'Sheet': To protect whole sheet, you have to simply click on the 'Sheet' section on the right side as you can see yourself.
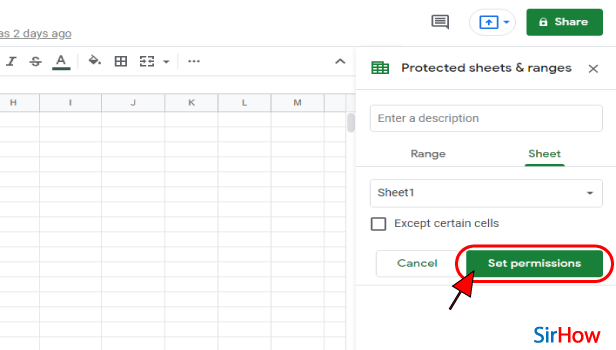
Step-8 Tap On 'Set Permissions' Option: Now, tap on the green button with the title 'Set Permissions.
This button whill let you choose between the option and define the permissions for this sheet.
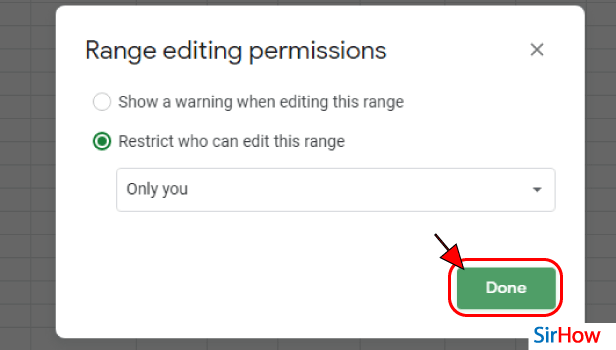
Step-9 Click On the 'Done' Button: Now, all you have to do is click on the 'Done' button. You have now successfully protected your Google sheets file.
FAQ
What Does It Exactly Mean to Protect Range in Sheets?
You have read the whole article, but you should know what is the exact meaning of protecting range in sheets.
The basic purpose of protecting data range in sheets is to stop people from editing that particular data range or part of the sheet. By protecting data range in Google sheets, you can set permissions for the collaborators to edit or not to edit certain data or information in the sheet.
You can even hide or make the data invisible for certain collaborators.
How Can One Check if a Range is Protected in Google Sheets?
You can check if a data range is protected in Google sheets or not in the following steps:
- Firstly, you have to open the Google sheet in which you want to check the presence of protected data.
- Then, in order to see the protected cells, you need to click on the 'View' tab.
- Then, tap on 'Protected ranges'. After that, a striped background will appear over the cells that contain the protected data.
In this way, you can protect sheets & amp ranges.
How Can I Remove Protection From Google Sheets?
Just like you can hide and unhide Google sheets columns, you can also protect and unprotect the data in Google sheets.
You can easily remove protection from data in Google sheets in the following steps:
- Open the Google Sheets application.
- Then, click on the Sheet that you want to open.
- If you have multiple sheets, then you have to click on the 'Down' arrow from here.
- Then, simply select the sheet you want to unprotect.
- Go to the Except certain cells box.
- Then, click on 'Select data range'.
- In your spreadsheet, then highlight the range you want to unprotect.
- Finally, click on 'Ok'.
Related Article
- How to Set Theme in Google Sheets
- How to Sort Filter Data in Google Sheets
- How to Import Data From one Google Sheet to Another
- How to Delete Cells, Row & Column in Google Sheets
- How to Make Group in Google Sheets
- How to Undo on Google Sheets
- How to Print Google Sheets
- How to Make Google Sheets Cells Fit Text
- How To Create Filter In Google Sheets
- How To Freeze A Google Sheet Row
- More Articles...
