How to Save Adobe Scanned PDF into JPEG
PDF copies might not be helpful all the time. You may require to save Adobe Scanned PDF into JPEG. But it's not a chore at all. You can do it from Adobe scan itself with just one click. By default, the application saves your scanned documents into a PDF format. When you save them as JPEG, you will be able to access them from your device gallery itself. So, before learning how JPEG formats are useful in daily life, let us understand how you can do that. Save Adobe
Save Adobe Scanned PDF into JPEG: 3 Steps
You can convert the PDF documents into a JPEG image format in just the following three steps.
Step-1 Launch the Application: If you want a JPEG format of your PDF document, you must have scanned some documents previously. If not, then open the Adobe Scan application.
- Use the camera feature to capture the document and save it as a PDF
- Once you are done with it, you can go further to save it as a JPEG.
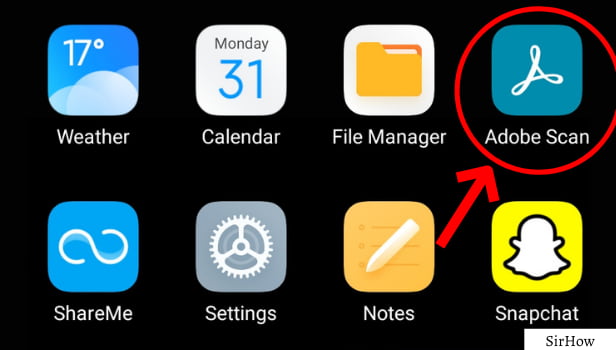
Step-2 Icon at Top-Left: When you open the Adobe Scan application, your camera is launched by default. In that screen itself, you see a home icon at the top of the screen on the left side. Click on that icon.

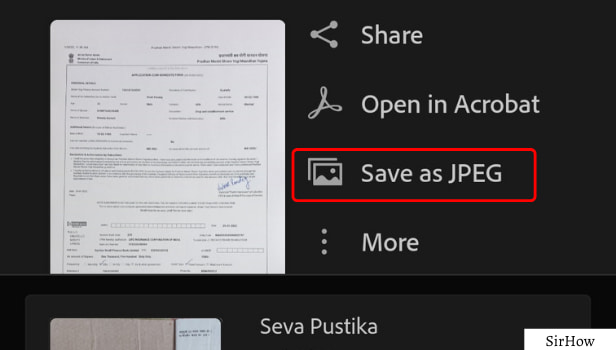
Step-3 Save as JPEG: Now, you are ready to save Adobe scan PDF into JPEG format. In the home icon, you see all the documents that you scan and save as PDF.
- From that, look for the one that you want to save as a JPEG.
- If it is the first PDF itself, you will read the third option of 'Save as JPEG' beside the PDF.
- If not, you will have to identify the icon. The icon of 'save as JPEG' is a mixture of copy icon and gallery icon.
- This is because the PDF is copied as a JPEG and saved to your photo gallery.
- Thus, your task to save Adobe Scanned PDF into JPEG is done.
Now, let us answer some very frequent questions that you might have.
What is the Use of Saving a JPEG of a document?
Well, when you have to upload your documents to some website, you need to upload them as a JPEG. This is because most of the websites do not allow uploading a PDF format.
- For example, you are filling up some exam forms online.
- You need to upload photos, signatures, mark sheets, and other similar documents.
- Here, most of the time it is compulsory to upload the documents in a JPEG format only.
- You can even share JPEG in WhatsApp as view once only for the higher safety of your documents.
- So, it becomes important to save them as a JPEG from PDF.
Can't We Just Click a Picture In Phone Camera Instead?
Well, you can do that but it will not give proper quality and necessary editing options. Adobe Scan provides a tool for cropping, removing unwanted elements, adding something on the document like a signature, direct sharing to other applications, a feature to rename documents anytime, store them, and sort them.
- Adobe Scan scans the document and provides multiple features. While your camera will just click it like a normal photo.
- It can auto-capture and allows to copy the text too.
- You do not have to do anything extra or use any other application for making edits.
- You can do everything just here right from capturing to storing to editing to sharing.
So, adobe scan is a beneficial application that gives you a lot of features. Your task becomes easy, quick, and efficient.