- Google Meet
- disable google meet chat
- disable gmeet camera
- send gmeet invitation multiple emails
- remove google meet calendar
- change google meet background
- use droidcam in gmeet
- cancel gmeet meeting calendar
- use gmeet without app
- disable waiting room gmeet
- disable gmeet in gmail
- use dualless google meet
- use grid view gmeet
- stop incoming calls during gmeet
- stop echo google meet
- use jamboard google meet
- use companion mode gmeet
- disable grid view gmeet
- disable visual effects gmeet
- report problem gmeet account
- use google meet phone
- change google meet account
- flip camera google meet
- disable google meet notifications
- disable captions google meet
- remove bottom bar gmeet
- share whiteboard google meet
- remove permissions google meet
- stop students joining meet
- gmeet link laptop to whatsapp
- remove guests google meet
- add your visual effect
- disallow screen share everyone
- mute guest google meet
- pin person google meet
- disable comments google meet
- remove google meet account
- stop presentation google meet
- share gmeet link in gclassroom
- disable google meet microphone
- change live caption language gmeet
- turn off meet audio
- share google meet link
- share screen google meet
- share meet link advance
- remove gmeet profile picture
- leave meeting google meet
- use google meet laptop
How to Use Grid View or Tiled View in Google Meet
You might want to see all the participants of your google meeting together on the screen. For this purpose, use grid view google meet. It is called a tiled view or grid view where all the participants are arranged in boxes spread over the entire screen. To clarify, you need to use google meet on your laptop. Because this feature is only available for laptops.
How to Enable Tiled or Grid view on Google Meet
Use Grid View or Tiled View in Google Meet in 8 Steps
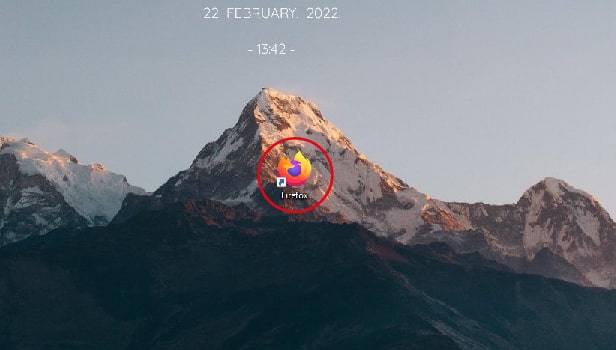
Step-1 Open any Browser: Now, once you open your laptop, go to the browser you regularly use. Using a different browser will not affect your performance or the upcoming steps. It will be the same for all browser versions on the laptop.
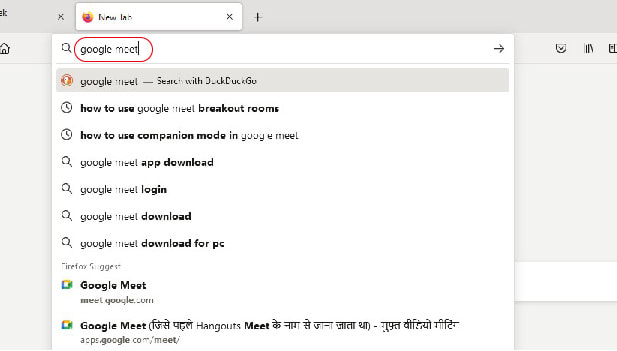
Step-2 Search Google Meet: Now, in the search bar, type in Google Meet. You can even directly type meet.google.com for getting quick and accurate results.
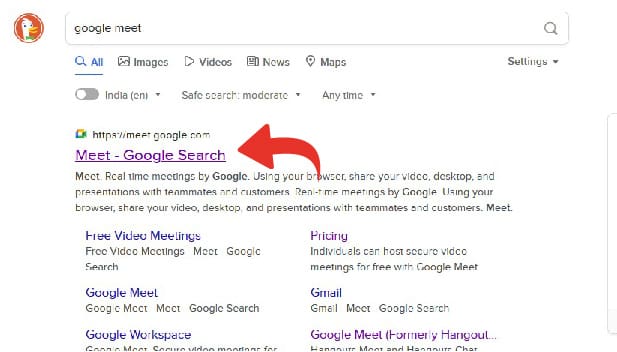
Step-3 Click on 'Meet – Google Search': Now, look at the image below. Click on the link that looks and read exactly like that.
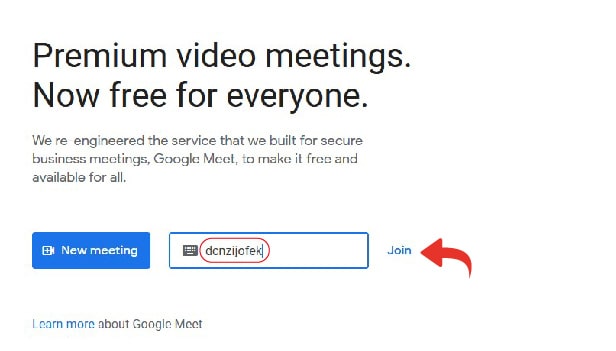
Step-4 Enter the Code and Join: If someone has shared a google meet in advance, then enter the code and join. You will be able to see a proper grid view only when there are more participants in google meet. So, once you enter the meeting, wait for more people to join in and then follow the steps further.
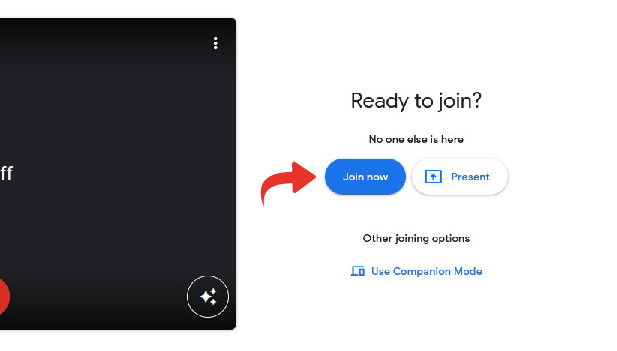
Step-5 Click on Ask to Join: But firstly, you, yourself need to join. So, tap on the join now, or ask to join option. See that your camera and microphone are on/off as per your requirements.
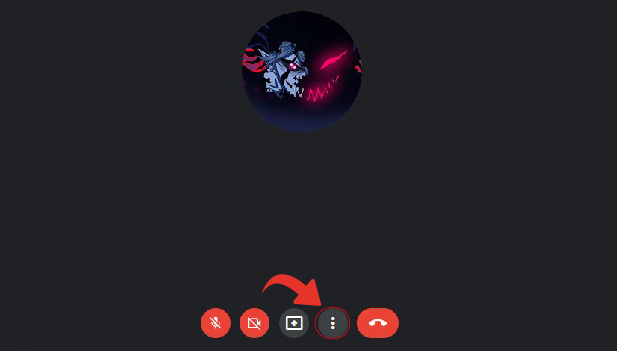
Step-6 Three-Dots: Now, at the bottom of the screen, you will see an option of three-dots. It is just beside the option to leave the meeting in google meet. Click on the three dots.
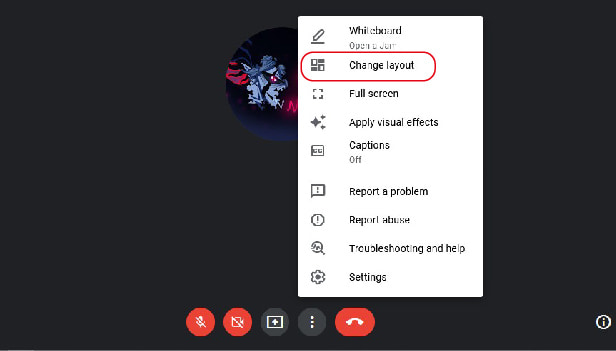
Step-7 Click On 'Change Layout': Now, a menu appears in front of you. Choose the option of changing the layout to use grid view google meet.
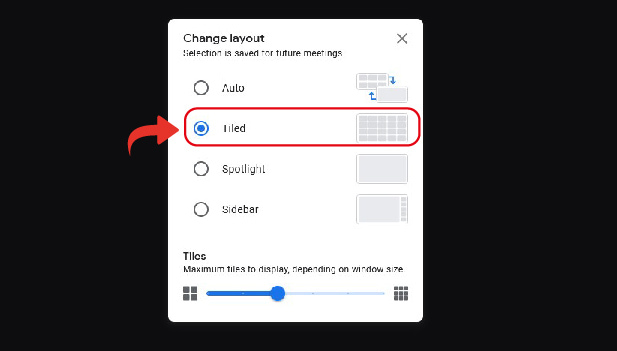
Step-8 Click on Tiled: Now here, click on the option of tiled. By clicking on that, your participants will be arranged in a grid or tiled form. Thus, your task is complete.
What are All the Layouts?
There are mainly four layouts in google meet.
- The first one is the Auto View. Here, google meets selects the layout accordingly by itself.
- In the tiled view, you can see all the participants arranged in small rectangles together on the screen. You can see 6, 9, 16, 30, 42, or 49 people together on the screen.
- In the spotlight mode, you either see the host, the shared screen, or the person you pin in google meet.
- In the sidebar mode, the one who speaks appears in the bigger part of the screen whereas other participants can be seen in the sidebar.
Can I Choose the Number of Tiles I Want to See at a Time on Screen?
Yes, there is a special feature available for tiled view. When you choose the option of tiled view, a slider bar gets activated at the bottom of the layouts option. You can see the image in Step-8. It shows the title 'Tiles' and has a slider beneath it. From there, you can either increase or decrease the number of participants you see in the grid altogether on the screen.
Isn't it amazing! Whenever you need to see everyone's reaction or take a group photo, you can use this mode. It is fairly easy. But remember, it is only available on google meet's laptop/desktop version.
Related Article
- How to Share Google Meet Link in Google Classroom
- How to Disable Google Meet Microphone
- How to Change Live Caption Language in Google Meet
- How to Turn Off Google Meet Audio
- How to Share Google Meet Link
- How to Share Screen in Google Meet
- How to Share Google Meet Link in Advance
- How to Remove Google Meet Profile Picture
- How to Leave Meeting in Google Meet
- How to Use Google Meet on Laptop
- More Articles...
