- Phonepe
- contact phonepe customer
- use phonepe gift card
- apply qr code phonepe
- pay challan phonepe
- recharge fastag phonepe
- refer phonepe
- unblock phonepe account
- use phonepe scratch
- book train ticket
- change banking name
- send money google pay
- set autopay phonepe
- raise ticket phonepe
- complete kyc phonepe
- add beneficiary account
- check transaction phonepe
- view account number
- sell gold phonepe
- buy gold phonepe
- change phonepe business
- logout phonepe account
- pay gas bill
- unlink phonepe account
- change upi pin
- delete phonepe account
- add bank account
- create upi phonepe
- use phonepe wallet
- reset upi pin
- use phonepe
- remove bank account
- add credit card
- change transaction limit
- close phonepe wallet
- change phonepe password
- change primary account
- check fastag balance
- delete business account
- cancel autopay phonepe
- check balance phonepe
- claim phonepe gift card
- install two phonepe apps
- check phonepe upi id
- remove phonepe bank account
- deactivate phonepe upi id
- delete phonepe upi id
- remove the account from phonepe
- recharge airtel in phonepe
- use phonepe for money transfer
- recharge metro card by phonepe
- recharge idea from phonepe
- add a new account in phonepe
- recharge phonepe wallet credit
- add credit card in phonepe app
- add double account in phonepe
- add rupay card phonepe
- delete card phonepe
- recharge d2h by phonepe
- reset phonepe bhim upi pin
- use phonepe scan and pay
- recharge phonepe wallet
- recharge play store phonepe
- recharge tata sky in phonepe
- check upi id on phonepe
- activate phonepe upi id
- use phonepe qr code
- install phonepe app in mobile
- create phonepe account
- recharge airtel dth phonepe
- block contact phonepe
- disable phonepe upi
- unblock contacts in phonepe
- pay bills using phonepe wallet
- recharge using wallet
- send money phonepe to bank
How to Use PhonePe for Money Transfer
In a safe and secure environment, PhonePe enables you to make simple mobile payments across India. It makes use of the UPI technology, which allows you to send money from one bank to another using a mobile phone or a VPA (Virtual Payment Address). Furthermore, PhonePe has a digital wallet for speedy returns.
The nicest part about this software is that it allows you to send money straight to your bank account without the usage of a credit card, debit card, OTP (One Time Password), or any other security passwords. PhonePe also has a digital wallet that allows for speedy reimbursements. This post will show you how to utilise PhonePe to make payments in a quick and easy manner.
How to use phonepe to send money to friends and family (Video)
Use PhonePe for Money Transfer : 7 Steps
Step 1 Open PhonePe Application First you need to download the PhonePe Application.
- If you have an Android phone, you can get it via the Google Play Store. We can get it via the App Store on Apple devices.
- Enter a new user name and phone number to create a PhonePe account. To authenticate your identity, you will receive an OTP.
- After that, you need to enter your basic details and account details to connect your back account.
- After that, you are all set to use PhonePe.

Step 2 Tap on To Bank/Upi ID Now you have opened your PhonePe app. Now you need to decide how you are going to send money.
- You can send it by using the receivers mobile number.
- Or you can use their UPI ID or Bank Details.
- By this method, you'll be able to transfer money from your account to the receiver's account easily.
- From this page, you can also check your bank balance.
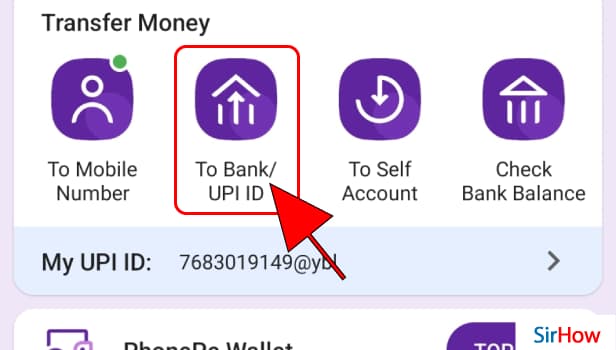
Step 3 Select bank After clicking on UPI ID or Bank Account, you'll get to see this screen as shown below.
- Now you need to select the recipients bank name.
- PhonePe supports nearly all the domestic and international banks, as PhonePe is most commonly used.
- You can also have multiple accounts on PhonePe and learn how to do that from here.
- After selecting the bank, you'll be taken to next stage.
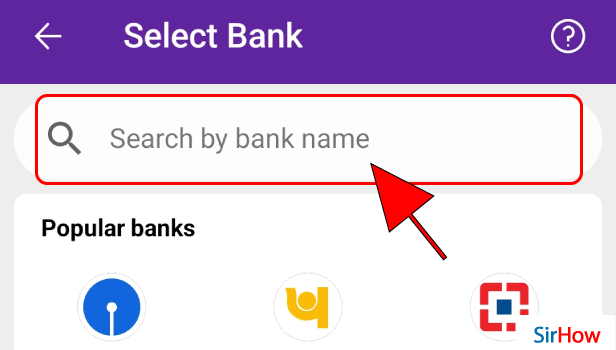
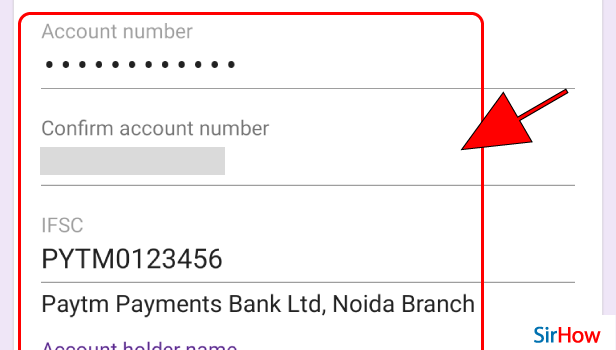
Step 4 Enter account details Here, you need to enter the bank details.
- You need to enter the account number, and confirm it.
- You will also need the IFSC code, which is unique for each branch of the bank.
- Followed by that, you need to enter the recipients name and other basic details that it asks for.
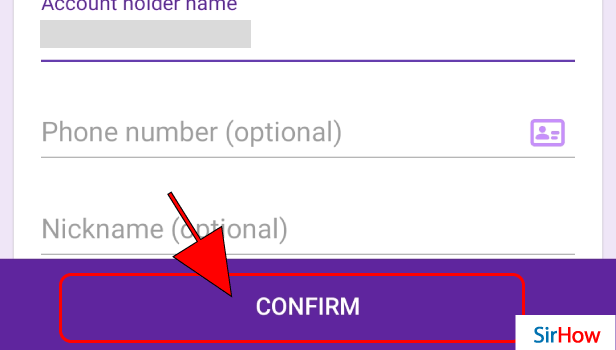
Step 5 Tap on confirm Fill in all the details carefully.
- Once done, you can hit the confirm button.
- But make sure that you have entered all the details correctly.
- These details can't be corrected after the payment is done.
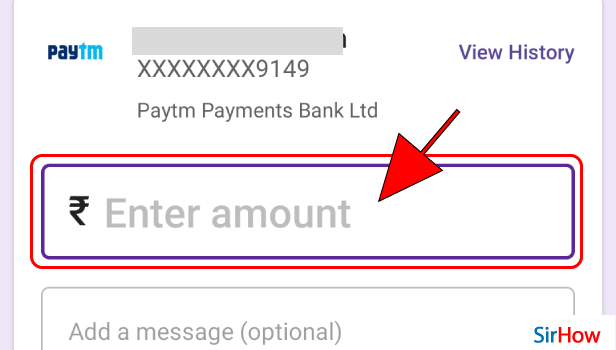
Step 6 Enter amount Now you need to enter the amount.
- Be careful while entering the amount.
- You have to enter the amount is numbers/digits.
- Kindly check more than twice before entering.
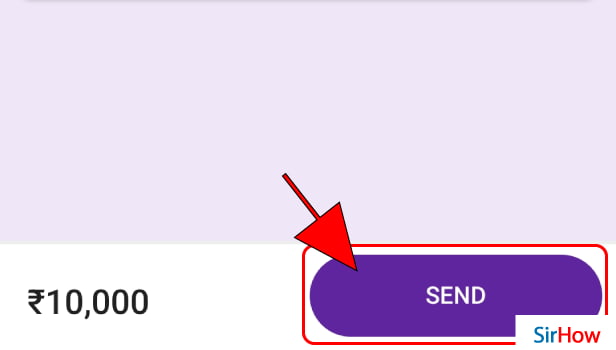
Step 7 Tap on send to pay Once your enter the amount, now it's ready to be sent to the recipient.
- At the bottom of the page, there will be a pay button.
- After checking all the details, hit that button.
- Remember, you can't undo anything after hitting pay button.
Commonly Asked Questions
Can I use PhonePe if my bank account is not connected to the UPI system?
You may still add your bank account to the PhonePe app if it isn't available on the Unified Payment Interface (UPI). However, you will be able to just receive payments and withdraw funds from it.
What are the limitations of PhonePe transactions?
A limit of Rs 10,000 in Wallet Transactions per month is allowed. For bank account transactions, the maximum amount you may transfer is Rs. 1 lakh per transaction.
For Wallet Balance withdrawals, you can withdraw up to Rs. 5000 per transaction from your wallet balance into your bank account. The monthly withdrawal limit is Rs 25,000.
Hope you found this article useful. You can also learn how to add credit card in PhonePe App from here.
Related Article
- How to sell gold in phonepe
- How to buy gold on phonepe
- How to change phonepe business bank account
- How to logout phonepe account
- How to pay gas bill in phonepe
- How to unlink phonepe account from flipkart
- How to change the UPI pin in phonepe
- How to delete Phonepe account
- How to add bank account in the Phonepe
- How to create a UPI id in Phonepe
- More Articles...
