How to Make YouTube Video Private
If you do not want every person using the Youtube app to see the video that you have published, you can make your Youtube video private.
When you make your Youtube video private then, only those people can watch the video you choose. They can be only your subscribers also. To increase subscribers, make your channel more interactive. Try to go live on YouTube to interact with your viewers. Let us brief you on how you can make your Youtube video private in 7 Steps.
How To Make A Video Private on YouTube
Make YouTube Video Private in 7 Steps
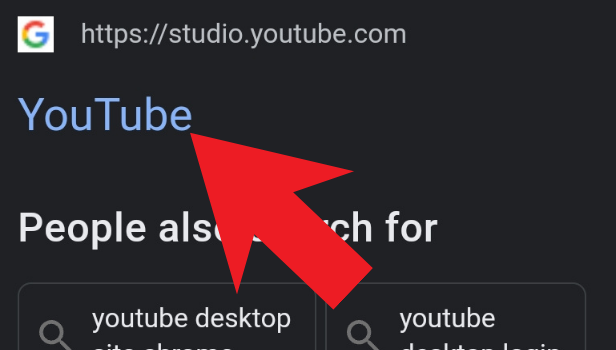
Step-1 Open YouTube Site or App: To make any video private on youtube, you obviously have to first access Youtube.
For this process, you can either open the Youtube app or the Youtube website also. Read more about it below:
- You can open the YouTube app by going to the app gallery of your mobile phone. Youtube must already be present there if youtube is installed on your device.
- And, to open the YouTube website you can go to your web browser and then, search for the YouTube website there.
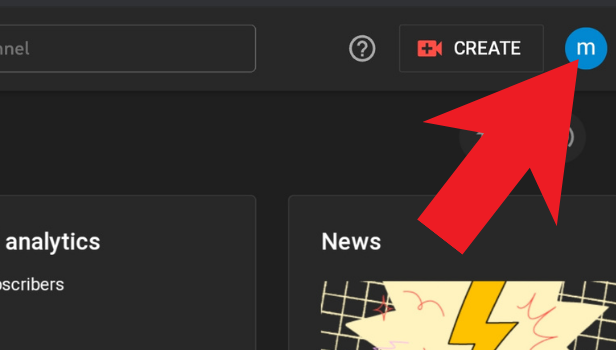
Step-2 Go To 'Your Profile': Every application has the 'Profile' option.
- Here also, you have to now click on your 'Profile' in the top right-most corner.
- Then, you just have to click on the option that says 'Your Channel'.
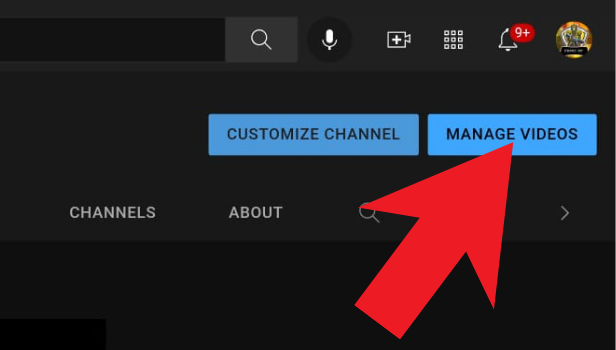
Step-3 Click on 'Manage Videos' Button: Now, you will find two button on the top right side of the screen as you can see yourself in the picture attached below. These two buttons are:
- CUSTOMIZE CHANNEL
- MANAGE VIDEOS
These buttons are blue in color. From these, you have to click on the second button that says 'Manage Videos'.
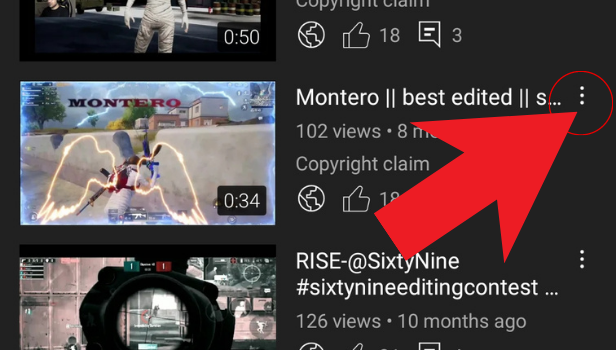
Step-4 Select The Video You want To Make Private: Then in this step, you have to select the video that you want to keep private. To select the video
- Just click on the video that you want to make private.
- Then, click on the three dots present at the right side of the video.
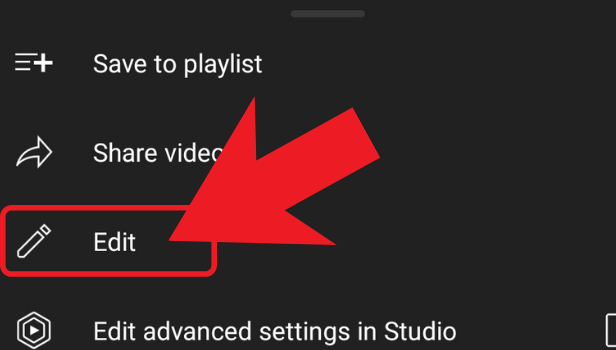
Step-5 Select 'Edit' Option: Several options will now appear on th right side of the screen as you can see in the picture below regarding your video. Some of these options are:
- Save to playlist
- Share video
- Edit
- Edit advanced settings in Studio
From these options, choose the third option which is the 'Edit' option.
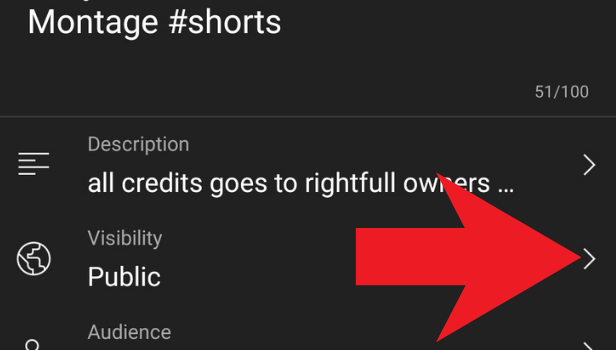
Step-6 Click on The 'Visibility Arrow': The next step is to go to the 'Visibility' option. The visibility of any YouTube video is set to Public by default. But, to change it you have to click on the arrow on the right side of the tab.
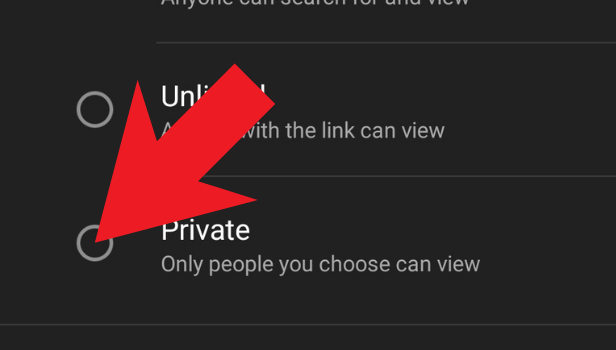
Step-7 Choose 'Private' Option: After clicking on the arrow, you will get a small list of options to determine the visibility of your youtube video.
Select the 'Private' option from these options and you're all set to go now! You video is now private.
FAQ
How Can I Make All of my YouTube Videos Private?
Instead of one, if you want to make all the videos on your YouTube channel private then follow the same process till step 4.
After Step 4, do the following:
- To select all the videos at the same time, you now have to click on the 'Select All' checkbox which is present in the upper-left corner of the video list.
- Another option to reach the same goal is to select the checkboxes next to the videos one by one, to which you want to apply the same privacy setting.
All the further steps will remain the same.
Is There any Difference Between a Private and unlisted YouTube video?
A private video is quite different from an unlisted YouTube video. Let us explain to you the difference in the following steps:
- When you make your Youtube video Private then it means that no one can watch your video apart from the people that you choose or you invite.
- Private videos do not show up even in Google search results or your channel searches.
- Whereas, an Unlisted video will not show in any search results or your channel. Only those who have the link to the video can watch the video.
How Can I Share a Private Youtube Video?
You can easily share a private video on the Youtube app with the help of the link or the URL of the video.
But the other person will only be able to watch the video if they are invited to watch or. The owner of the channel needs to allow the person and after then only, they can watch the video with the help of the link, otherwise not. If you want, you can set a private video for your subscribers only. You can also see your subscribers on youtube.
How Much Money Does a Private YouTube Channel Cost?
As you might already know that YouTube does not charge even a single penny to upload videos on the app and become a creator.
In fact, you can start earning through the Youtube app after you have reached a minimum of 1000 subscribers on your channel. For this, you have to apply for the Youtuber Partner Program.
But, to make the best and high-quality content, you have to buy expensive equipment like a camera, microphone, lights, and desktop or a system to edit your videos which will cost you a good investment.
Another Method
You can make your YouTube video private if you have such content which you don’t want users to watch it. You can do changes while uploading time but you can make changes even after a few days of uploading the video.
You can make changes to any old video on your channel. Making private the video means that nobody can watch your video except you.
Let’s see how you can make your YouTube videos private.
Steps to make uploaded YouTube video private
You can make changes to the video’s privacy only on the browser. This feature is not available on mobile apps. You can manage the privacy of the video on the mobile app while uploading. You can make changes to your recent video on a desktop only.
Follow these quick steps to make your uploaded YouTube video private:
- Open your browser: Open your preferred browser.
- Open YouTube: Open YouTube and sign in with your Gmail account.
- Click on the profile picture: Click on your profile picture at the top right corner.
- Click on ‘creator studio’: Click on the creator studio in all given options.
- Click on ‘video manager’: Click on the ‘video manager’ option in the left corner.
- Click on the ‘video’ option: This option has two options. One for video and one for playlists. Click on ‘video’ option.
- Choose the video: Now in the right corner, you can see your videos. Choose the video, you want to make private
- Click on ‘edit’: Now click on the edit option to make changes.
- Click on ‘privacy settings: You can click on the ‘privacy settings’ option to change the privacy
- Click on ‘private’: You will see options – public, unlisted, private. Choose the option ‘private’.
Now your video is private on your account. Now nobody can watch it on YouTube.
Steps to make YouTube video private while uploading
You can make privacy changes even when you upload the video. Let’s see quick steps to understand it on both desktop and mobile app.
How to make YouTube videos private on desktop
- Open YouTube: Open YouTube and sign in with your YouTube account.
- Click on the ‘upload’ icon: Click on the ‘upload’ option at the top right corner then click on the ‘upload video’ option.
- Select the file from your computer: Now choose the file you want to upload. Your file will start uploading. It takes time.
- Choose the privacy: Choose the privacy on the right of the video title. Now choose the ‘private’ option to make your new video private.
When your video will be uploaded, it can be seen by you only. That’s how you can make your video private.
How to make YouTube videos private on the mobile app
Just follow these quick steps:
- Open YouTube: Open the YouTube app and sign in with your Gmail account.
- Tap on the upload icon: Tap on the upload icon at the top of your app screen.
- Select the file from your phone: Now select the file you want to upload.
- Complete the filters and music edit: Complete the process of editing on your video and tap next.
- Tap on the privacy and choose ‘private’: Tap on the privacy option below the description. You will see three options. Choose ‘private’ option at the end.
Now you can tap on the ‘upload’ option on the right and your video will be seen only by you after uploading. Your newly uploaded video is private.