- Gmail
- block contacts gmail
- mute gmail app
- turn out office
- update phone number
- write email gmail app
- change password gmail
- change recovery email
- set dark mode
- turn dark mode
- block sender gmail
- undo sent mail
- stop unwanted emails
- delete emails gmail app
- outlook account gmail app
- designate gmail app
- google chat gmail app
- send hyperlink gmail app
- outlook gmail app
- sound gmail app
- labels gmail app
- update promotions gmail app
- verification gmail app
- get notifications gmail app
- update the gmail app
- block email gmail app
- unsend email gmail app
- insert signature gmail app
- date birth gmail app
- email unread gmail app
- send videos gmail app
- delete history gmail app
- mark read gmail app
- forward gmail app
- trash gmail app
- move folders gmail app
- folders gmail app
- recovery gmail app
- yahoo mail gmail app
- email date gmail app
- snooze gmail app
- sync settings gmail app
- encrypt gmail app
- view gmail app
- compose gmail app
- make call gmail app
- get gmail safari
- address gmail app
- read gmail app
- autofill gmail app
- find unread gmail app
- office 365 gmail app
- delete promotion gmail app
- office gmail app
- font size gmail app
- unsubscribe from emails gmail
- theme gmail app
- cache gmail app
- off sync gmail app
- sign out gmail app
- see archived gmail app
- delete unread gmail app
- remove account gmail app
- hyperlink gmail app
- archived in gmail app
- add gmail app
- accounts gmail app
- download gmail app
- delete sender gmail app
- contacts to gmail app
- recall gmail app
- google meet gmail app
- swipe gmail app
- change notification gmail app
- attach file in gmail
- mark gmail app
- select all gmail app
- gmail home screen
- text color gmail app
- sort gmail app
- yahoo gmail app
- storage gmail app
- edit contacts gmail app
- sharing gmail app
- delete email gmail app
- how to chat on gmail app
- promotions gmail app
- number gmail app
- notification on gmail app
- disable gmail app
- filter gmail in app
- text gmail app
- searches gmail app
- name gmail app
- individual gmail app
- delete in gmail app
- background gmail app
- profile gmail app
- password gmail app
- unread emails gmail app
- image gmail app
- trash in gmail app
- attachment gmail app
- access calendar gmail app
- change signature gmail app
- archived email gmail app
- signature gmail app
- auto sync gmail app
- unmute gmail app
- date gmail app
- images gmail app
- video chat gmail app
- archive gmail app
- whitelist gmail app
- old email gmail app
- video gmail app
- conversation gmail app
- canned gmail app
- view calendar gmail app
- gmail app light mode
- pdf gmail app
- pin email gmail app
- settings gmail app
- color gmail app
- uninstall gmail app
- delete member whatsapp community
- create whatsapp community
- link whatsapp group
- unsubscribe gmail app
- archived gmail app
- unread on gmail app
- view contact gmail app
- trade license uae
- how to enquire trade name in uae
- contacts gmail app
- sync gmail app
- calendar events uae
- apply job uae
- call gmail app
- file gmail app
- filter gmail app
- outlook email gmail app
- font gmail app
- hotmail gmail app
- view email gmail app
- cc gmail app
- second email gmail app
- calendar gmail app
- attachments gmail app
- notification gmail app
- undo gmail app
- unblock gmail app
- reply gmail app
- dark mode gmail app
- ads gmail app
- sender gmail app
- account gmail app
- sort unread gmail app
- sort email gmail app
- invite gmail app
- unread gmail app
- delete gmail app
- search gmail app
- spam gmail app
- refresh gmail app
- email gmail app
- meet tab gmail app
- bin gmail app
- attach image gmail
- add account gmail app
- compose email in gmail app
- delete social gmail app
- create group gmail app
- delete account gmail app
- change language gmail app
- change dark mode gmail app
- search trash gmail app
- format font in gmail
- change default font gmail
- sort emails in gmail
- search by date gmail
- Delete sent email Gmail
- Mark read Gmail
- filter emails gmail
- Attach folder Gmail
- Group in Gmail
- export emails gmail
- Add link Gmail
- Forward Gmail Account
- archived emails gmail
- Change Gmail password
- send email gmail
- sign out gmail
- create gmail signature
- Email to G Group
- font size gmail
- delete all emails
- view unread mails
- unsubscribe emails gmail
- switch gmail accounts
- search in gmail
- print email gmail
- fax in gmail
- empty trash gmail
- delete old emails
- create g email list
- change background gmail
- send group email
- link gmail accounts
- schedule email gmail
- remove g accounts android
- recall gmail email
- archive mails gmail
- delete g profile pic
- create group gmail
- delete gmail account
- deactivate gmail account
- attach an email in gmail
- attach file gmail
- create gmail account
- cc feature gmail
- delete folder gmail
- create folders gmail
- change gmail address
- reset gmail password
- change signature Gmail
- gmail password iphone
- change password mobile
- block user gmail
- add signature gmail
How to Delete Autofill Email Address in Gmail App
Gmail has a feature that automatically saves the contact information of your email conversations. But you might want to Delete Autofill Email Address in Gmail App because not every email conversation's contact information needs to be saved, right? So, in this article, you will get your 10-step guide on Deleting Autofill Email Addresses in Gmail. But before you take any steps, log in to your Gmail account.
Delete Autofill Email Address in Gmail App: 10 Steps
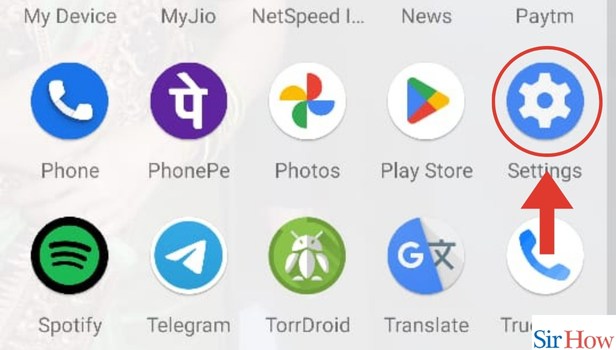
Step 1- Open Settings on your Mobile: In the first step, you need to open Settings on your mobile. If you can't find Settings, search it in the search bar of your apps grid.
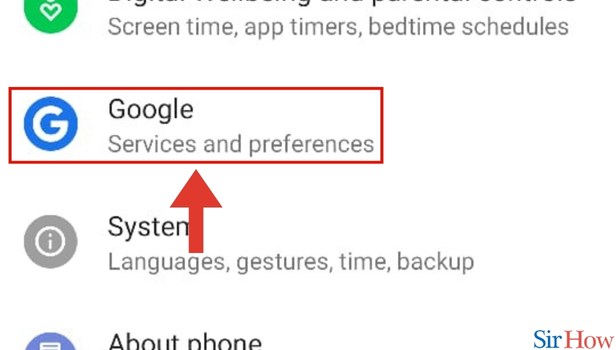
Step 2- Tap on Google: Once you are on Settings, you will see several options. Out of these options select Google.
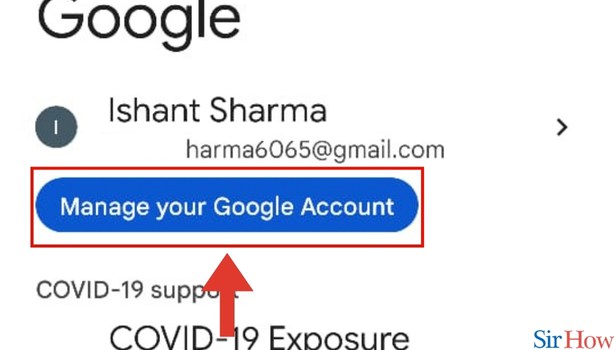
Step 3- Tap on Manage your Google Account: Once you select Google, you will see the option Manage your Google Account. Click on Manage your Google Account.
Step 4- Tap on People and Sharing: Once you click on Manage your Google Account, you will see several options like Security, People, and sharing, Payments, etc. Select People and share.

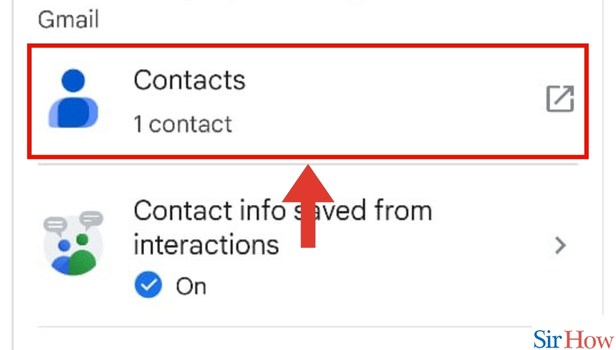
Step 5- Tap on Contacts: After you click on People and Share, you will see a list of options. Out of this list, select Contacts.
Step 6- Tap on three Horizontal Lines: Once you select contacts, you will see the contacts screen. On this screen, you will see three horizontal lines in the top left aka hamburger button.
- Click on the hamburger button.

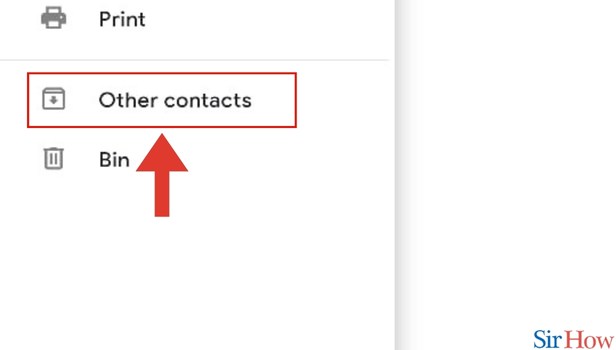
Step 7- Tap on Other Contacts: Once you click on the hamburger button, you need to click on Other Contacts.
Step 8- Select the email: Once you click on Other accounts, you will see your Gmail contacts. From here, select the relevant email.
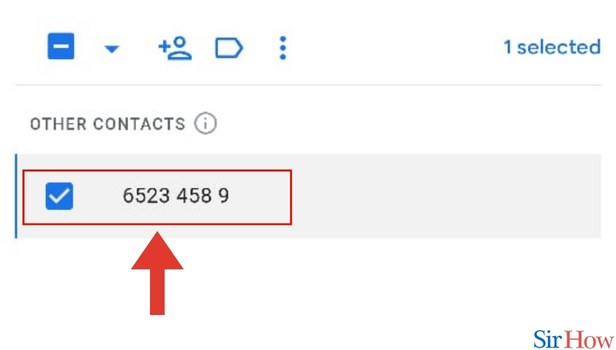
Step 9- Tap on Three vertical Dots and then on Delete: Once you select the relevant email, you will see three horizontal dots at the top. Click on the three horizontal dots. You will see a list of options.
- From this list, click on Delete.

Step 10- Tap on Move to Bin: Now, as the last step, you just need to click on the Move to the bin option.

These steps will make it easy for you to Delete Autofill Email Address in Gmail App. But if you want to resolve your queries, you can do it with the FAQs below. Additionally, if you want to learn how you can change your account in Gmail App on your iPhone, you can do it in a few simple ways.
FAQs
What do Contacts on Gmail mean?
Your contacts on Gmail are essential to all your Google contacts.
Why can't I edit some contacts on Gmail?
That could be happening because the contact features that you're trying to edit have been updated on Google. Contact features updated on Google can't be edited like the Google profile of a Gmail account.
Do autofill emails take up space in Gmail?
Autofill email addresses do not take up a lot of space. But if you think you want to turn this feature off, Gmail does allow you to do it.
How can I clear up space in my Gmail app?
You can clear up space in your Gmail app by clearing Gmail storage and cache.
What is the main benefit of clearing the cache?
The main benefit of clearing the cache is that it helps your Gmail app function at a better speed.
These FAQs will solve your questions about Deleting Autofill Email Addresses in Gmail App.
Related Article
- How To Forward Mail In Gmail App
- How To Empty Trash In Gmail App
- How To Move Emails To Folders In Gmail App
- How To Delete Folders In Gmail App
- How To Add Recovery Email In Gmail App
- How To Add Yahoo Mail In Gmail App
- How To Search Emails By Date In Gmail App
- How To Turn Off Snooze In Gmail App
- How To Change Sync Settings In Gmail App
- How To Encrypt Email In Gmail App
- More Articles...