How to Change Recovery Email in Gmail App
In today's digital age, having a reliable recovery email is crucial to ensure the security of your online accounts. Gmail, being one of the most popular email providers, offers users the option to set up a recovery email that can be used to reset the password and regain access to the account in case of any mishaps. However, if you need to change your recovery email, it can be a bit confusing to figure out how to do it through the Gmail app. In this blog post, we'll provide you with a step-by-step guide on how to change your recovery email in the Gmail app, so you can have peace of mind knowing your account is secure.
Change Recovery Email in Gmail App by Taping on Profile: 9 Steps
Step 1- Open Gmail App:- To begin, open the Gmail app on your smartphone or tablet. If you haven't already signed in to your Gmail account, do so now.
- Make sure you have a stable internet connection to avoid any interruption during the process.
- If you have multiple Gmail accounts, make sure you are signed in to the correct one.

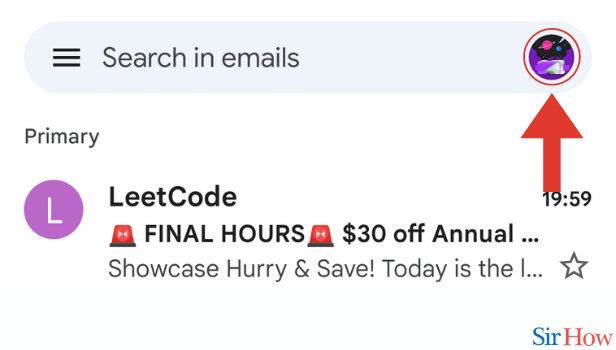
Step 2- Tap on Profile:- Next, tap on your profile picture located in the top right corner of the screen. This will open a dropdown menu with several options.
- Make sure you are tapping on the correct profile picture to avoid any confusion.
- If you don't see your profile picture, tap on the icon with the first letter of your name instead.
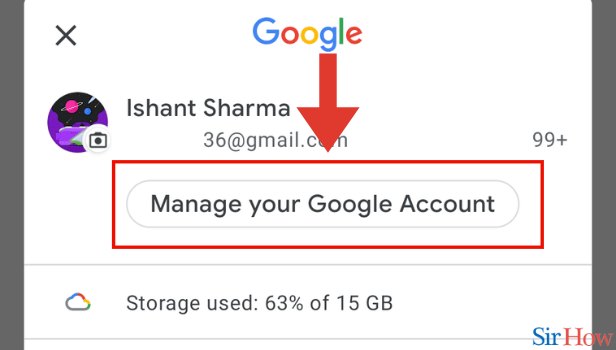
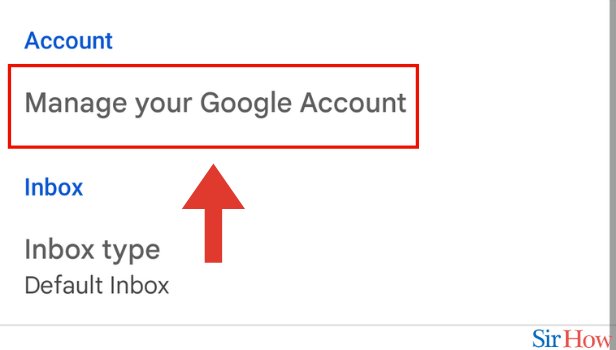
Step 3- Tap on Manage Account:- In the dropdown menu, tap on the "Manage your Google Account" option. This will take you to your Google account settings.
- Double-check to make sure you are tapping on the correct option.
- You can also access your Google account settings by going to https://myaccount.google.com/ in your web browser.
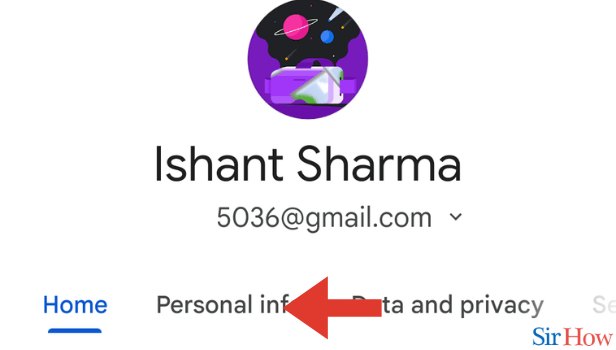
Step 4- Slide Tags:- Once you are in your Google account settings, slide the tags at the bottom of the screen until you see the "Security" option. Then tap on it.
- If you have trouble finding the "Security" option, try using the search bar at the top of the screen.
- Make sure you are scrolling all the way to the bottom of the screen to see all the available tags.
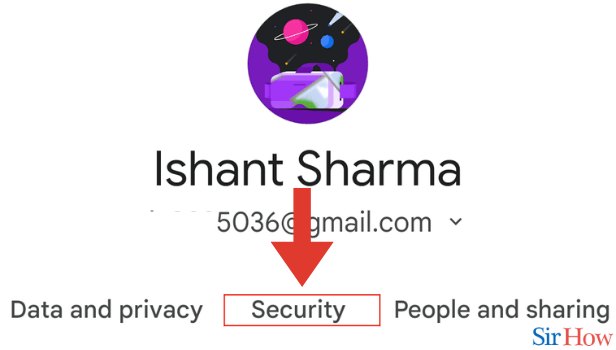
Step 5- Tap on Security:- In the "Security" section, tap on the "Security" tab to view your account security settings.
- Take some time to review your account security settings while you're here to ensure everything is up to date.
- You can also access your account recovery options from this screen.
Step 6- Tap on Recovery Email:- Under the "Ways we can verify it's you" section, tap on the "Recovery email" option.
- Your recovery email is the email address you designated to use in case you forget your password or are locked out of your account.
- Make sure you have access to the recovery email you want to use before changing it.

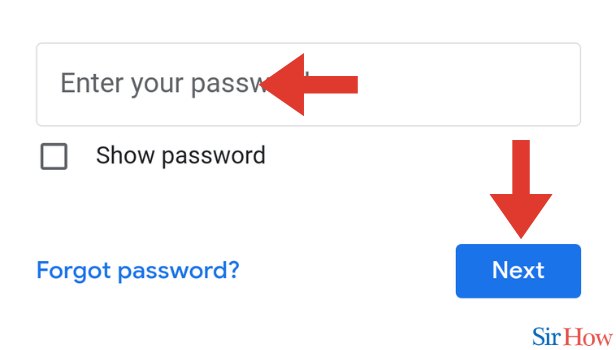
Step 7- Enter Password and Tap on Next:- You will be prompted to enter your Gmail account password. After entering your password, tap on the "Next" button.
- Make sure you are entering your password correctly to avoid any errors.
- If you have forgotten your password, you will need to reset it before continuing.

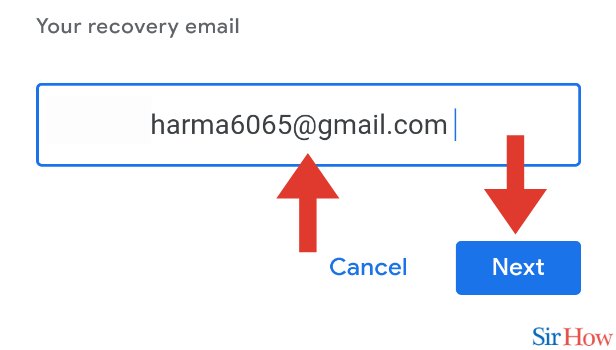
Step 8- Enter Email and Tap on Next:- Next, enter the email address you want to use as your new recovery email. Then tap on the "Next" button.
- Make sure you double-check the email address you entered to avoid any typos.
- You can use any valid email address you have access to as your recovery email.

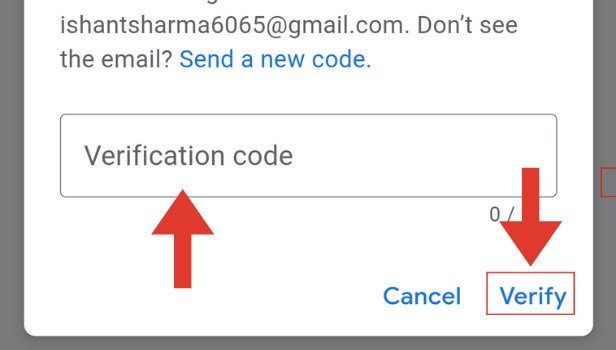
Step 9- Enter Verification Code and Tap on Verify:- You will receive a verification code at the email address you just entered. Enter the verification code in the space provided and tap on the "Verify" button to complete the process.
- Check your email inbox or spam folder if you don't receive the verification code right away.
- Make sure you enter the verification code correctly to avoid any errors.
Change Recovery Email in Gmail App Through General Settings: 14 Steps
Step 1- Open Gmail App:- Open the Gmail app on your mobile device.
If you have not installed the Gmail app on your device, go to the Google Play Store (for Android users) or the App Store (for iOS users) and download it.
Ensure that your device is connected to the internet before opening the Gmail app.

Step 2- Tap on Three Horizontal Lines:- On the top left corner of the screen, you will see three horizontal lines, tap on them.
If you can't find the three horizontal lines, look for the Gmail icon at the top left corner of the screen, and tap on it.
If you are using an older version of the Gmail app, the icon may look like three stacked dots.

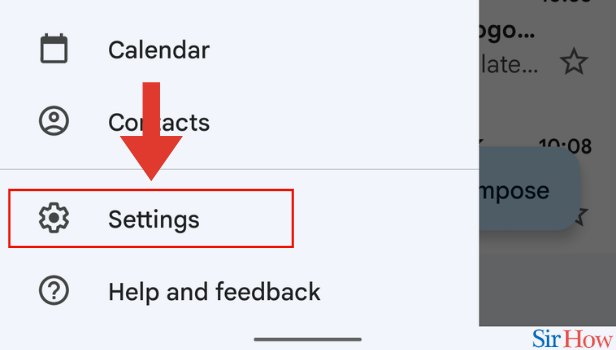
Step 3- Tap on Settings:- Scroll down to the bottom of the menu, and you will see "Settings." Tap on it.
If you are unable to locate the Settings option, try tapping on your account profile picture or initials instead.
If your device is running an older version of the Gmail app, the Settings option may be listed as "More."
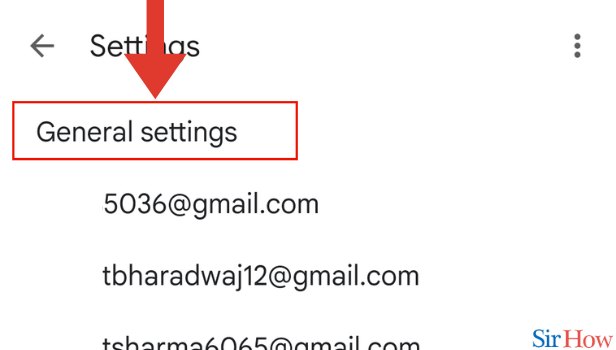
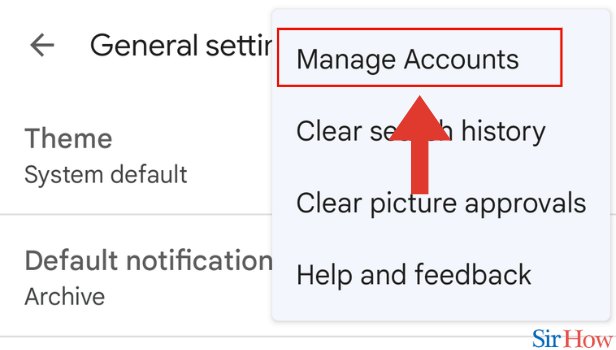
Step 4- Tap on General Settings:- In the Settings menu, scroll down to "General Settings," and tap on it.
If you don't see General Settings, scroll down further and look for the "Accounts" option.
If you are using an older version of the Gmail app, the option may be labeled as "Accounts and Import."
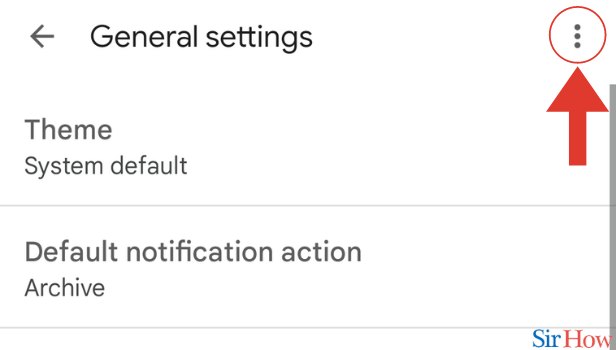
Step 5- Tap on Three Vertical Dots:- Tap on the three vertical dots at the top-right corner of the app screen.
- The three vertical dots are also known as the overflow menu.
- This menu contains additional options that are not visible on the main settings page.
Step 6- Tap on Manage Account:- From the overflow menu, tap on the "Manage account" option.
- This option is usually located near the bottom of the overflow menu.
- The Manage account option allows you to access various account-related settings.
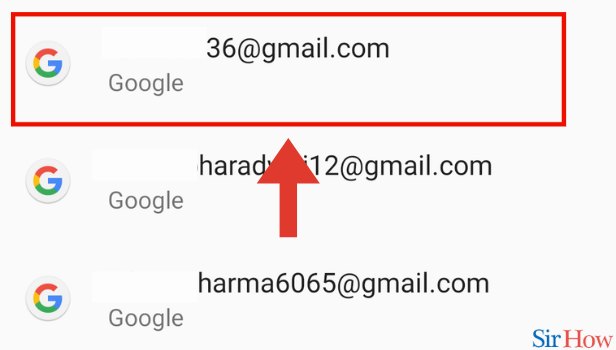
Step 7- Choose Account:- If you have multiple accounts linked to the Gmail app, select the account for which you want to change the recovery email.
- You can add multiple accounts to the Gmail app from the main menu by tapping on your profile icon.
- Make sure you select the correct account to avoid making changes to the wrong account.
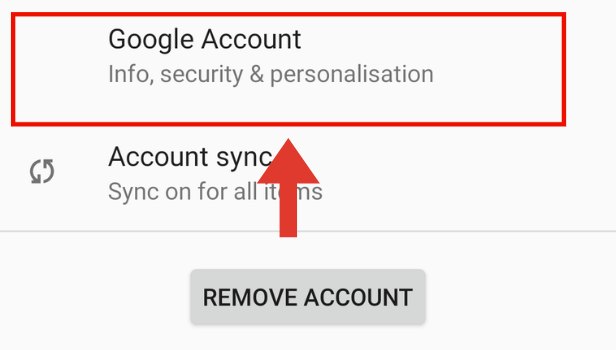
Step 8- Tap on google Account:- Under the Account section, tap on the "Google Account" option.
- The Google Account option allows you to manage various settings related to your Google account.
- This option may be labeled differently on some devices, such as "Accounts and Sync" or "Accounts".
Step 9- Slide Tags:- On the next page, slide the tags to reveal the "Security" option.
- The tags are usually located at the top of the page and can be swiped left or right.
- Some devices may have a different layout or design, so you may need to look for the Security option elsewhere.

Step 10- Tap on Security:- Tap on the "Security" option.
- The Security option contains various security-related settings for your account.
- Make sure you're on the Security page before proceeding to the next step.

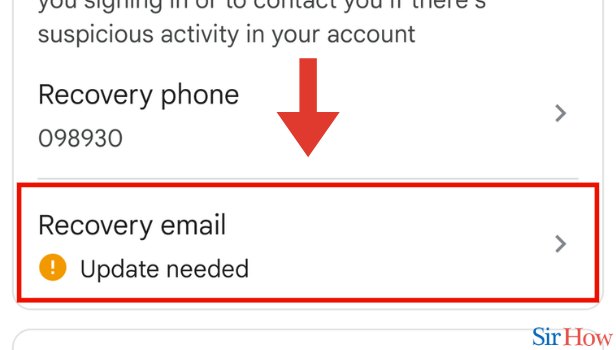
Step 11- Tap on Recovery Email:- Under the "Ways we can verify it's you" section, tap on the "Recovery email" option.
- The recovery email is the email address you use to recover your account in case you forget your password or get locked out.
- You can also add a phone number or a security key as additional recovery options.
Step 12- Enter Password and Tap on Next:- Enter your Gmail account password and tap on the "Next" button.
- Make sure you enter the correct password to avoid getting locked out of your account.
- If you forgot your password, you can reset it
Step 13- Enter Email and Tap on Next:- Enter the new recovery email address you want to add to your Gmail account and tap on the "Next" button.
- Make sure you enter the correct email address to avoid any errors or issues.
- It's a good idea to use a recovery email address that you have access to and check regularly.
Step 14- Enter Verification Code and Tap on Verify:- Check your new recovery email address for a verification code from Google. Enter the code in the verification field and tap on the "Verify" button.
- The verification code may take a few minutes to arrive in your new recovery email address.
- If you didn't receive the verification code, check your spam or junk folder.
- Make sure you enter the code correctly and without any typos to avoid any issues.

Change Recovery Email in Gmail App Through Account Setting: 11 Steps
Step 1- Open Gmail App:- Open the Gmail app on your mobile device. Make sure you are signed in to your account.
Ensure that you have a stable internet connection for a seamless experience.

Step 2- Tap on Three Horizontal Lines:- Tap on the three horizontal lines located in the top left corner of the app screen. This will open the Gmail menu.
If you are having trouble finding the menu icon, look for the word "Menu" written beside the three horizontal lines.

Step 3- Tap on Settings:- Scroll down the menu and tap on the "Settings" option.
You can also use the search bar at the top of the menu screen to quickly find the settings option.

Step 4- Tap on Email:- Tap on the "Email" option from the list of available settings.
The email option will usually be located at the top of the list of settings.

Step 5- Tap on Manage Account:- Scroll down the "Email" settings page and tap on "Manage Accounts."
If you have multiple email accounts linked to your Gmail app, make sure you select the correct account for which you want to change the recovery email address.
Step 6- Slide Tags:- Swipe left or right on the account name to reveal the "Tags" option. Tap on "Tags."
You can use the tags option to organize your email accounts and make them easier to manage.

Step 7- Tap on Security:- Scroll down the "Tags" page and tap on "Security."
Make sure you have your password ready, as you will need to enter it to access the security settings.

Step 8- Tap on Recovery Email:- Under the "Security" settings, tap on "Recovery Email."
You can also change other security settings from this page, such as two-factor authentication and password recovery options.

Step 9- Enter Password and Tap on Next:- Enter your Gmail account password and tap on "Next."
Make sure you enter the correct password to avoid any issues with accessing your account.

Step 10- Enter Email and Tap on Next:- Enter the new recovery email address and tap on "Next."
Double-check the email address you entered to ensure it is correct.

Step 11- Enter Verification Code and Tap on Verify:- Check your new recovery email address for the verification code and enter it in the provided field. Tap on "Verify" to confirm the change.
If you don't receive the verification code, check your spam or junk mail folders.

Changing your recovery email address in the Gmail app is a straightforward process that can be completed in a few simple steps. By following the above instructions and tips, you can easily update your recovery email and enhance the security of your account.
Tips
- Ensure you have a stable internet connection for a seamless experience.
- Double-check the email address you entered to ensure it is correct.
- Make sure you enter the correct password to avoid any issues with accessing your account.
FAQ
Q1. Why is it important to change my recovery email address in Gmail?
A1. Changing your recovery email address in Gmail can help enhance the security of your account and ensure that you can recover your account in case of any issues.
Q2. Can I change my recovery email address from the web version of Gmail?
A2. Yes, you can change your recovery email address from the web version of Gmail by following similar steps.
Q3. What should I do if I don't receive the verification code?
A3. Check your spam or junk mail folders, and if you still don't receive the code, try requesting a new one.
Q4. Can I use any email address as my recovery email in Gmail?
A4. Yes, you can use any valid email address as your recovery email in Gmail, as long as you have access to it.
Q5. Will changing my recovery email address affect my other Gmail settings?
A5. No, changing your recovery email address will not affect any of your other Gmail settings.
Q6. Can I have multiple recovery email addresses in Gmail?
A6. No, you can only have one recovery email address linked to your Gmail account.
Q7. Is it necessary to change my recovery email address frequently?
A7. No, it is not necessary to change your recovery email address frequently unless you suspect that your account has been compromised or you no longer have access to your recovery email.