How to Book Ola for Full Day
Ola cab booking service offers a number of different services to its users. The reason for this is that Ola aims at satisfying all their customers. Therefore the option to book an Ola for a full day is one such service. This service is not the same as booking an Ola round trip. Any user can book an Ola for full day by accessing the rental options while booking the cab. The steps to do so are explained below.
How to book ola rental
Steps to Book Ola for Full Day
1. Launch the App: The first step to book an Ola for a full day is to launch the application. This means you have to locate the application from your phone's application drawer as shown by the arrow below. Tap on the Ola icon once you find it within the application drawer. 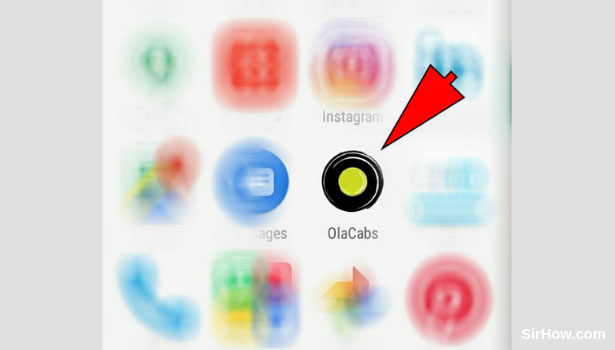
2. Turn on the device's location: As a result of opening the Ola application, you will get a pop-up shown in the picture below. This pop-up will ask you to turn on the device's location if it is not already on. The application uses the location to function properly and thus it is important to turn on the location. Tap on the OK option shown by the arrow to turn on the current location of your device. 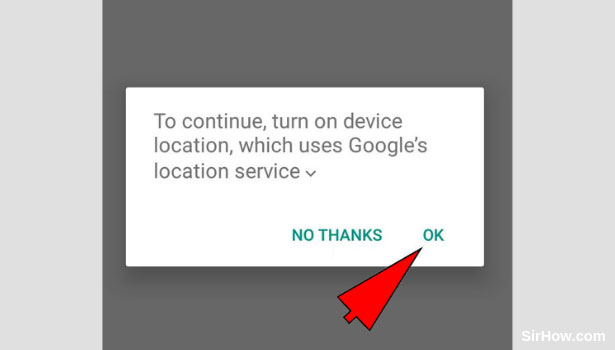
3. Open the Pickup location option: Once you turn on the device's current location, you will be taken to the Ola home-screen. This hone-screen will include several options for you to use. The first thing you need to do is to enter the pickup location. The pickup location represents the address from which you want to be picked up. Tap on the pickup location option shown by the arrow mark. 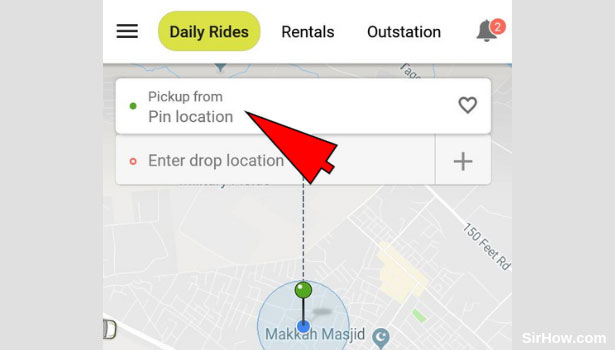
4. Enter the Pickup address: Ola will redirect you to the section shown below, as a result of opening the Pickup location option. This section will include a search bar which you can use to search for the pickup location. Tap on this search bar as shown by the arrow and enter the address. Consequently, you will find a list of results. Tap on the most accurate result that appears in the list. 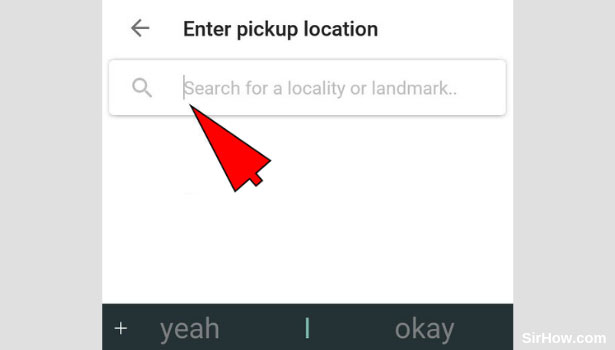
5. Open the Drop location option: Once you enter the pickup location, you will be taken back to the home screen of Ola. You can now enter the drop location of your ride. The drop location is the address of your destination. Tap on the drop location shown by the arrow mark to enter the address of the destination you want to travel to. 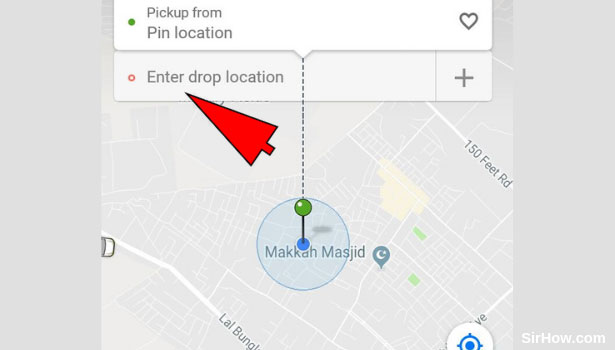
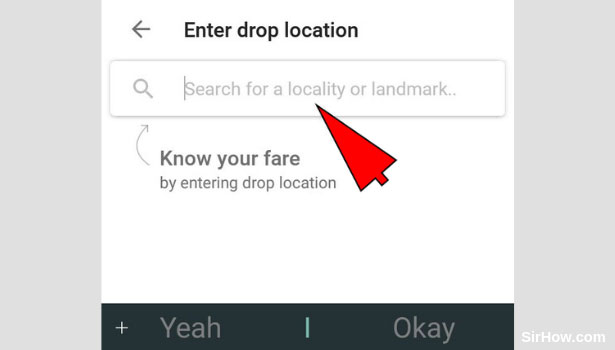
6. Enter the Drop location address: As a result of opening the drop location option, you will be switched to the section shown below. The search bar indicated by the arrow mark can be used to search for the address of your drop location. Tap on the search bar and enter the address you want to travel to. Consequently, you will get a list of results from which you have to pick the most appropriate result.
7. Tap on the Rentals option: After you have entered the pickup location as well as the drop location, you will get the screen shown below. This is the step where the one major change has to be made. Rather than booking Daily rides or outstation cabs, you have to select Rentals. Tap on the Rentals option as shown by the arrow mark to book an Ola cab for a full day. Once you select the Rentals option, it will get highlighted in yellow. 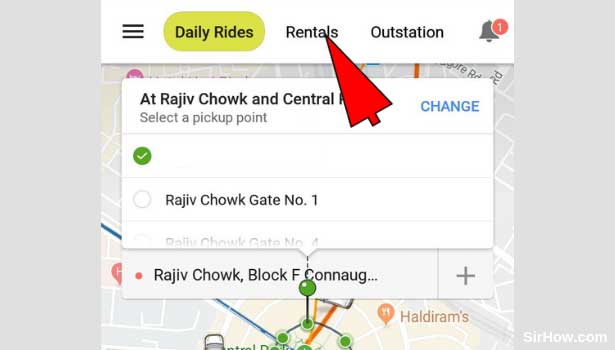
8. Tap on the Ride now option: Once you have selected the Rentals option, you will get the following options at the bottom of your screen on the same page. These options allow you to either book it for the immediate ride or schedule it. Tap on the Ride now an option as shown by the arrow since we are only talking about booking immediate rides. 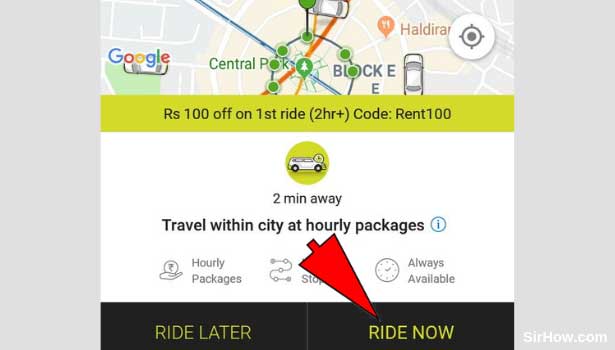
9. Skip the Confirmation message: After you Hit the Ride now option, you will get the following pop-up message from Ola. This is a message asking if the Ride is for yourself or for someone else. Skip these steps since we are only concerned with booking an Ola rental for ourselves. Tap on the Skip option shown by the arrow mark, to skip this step. 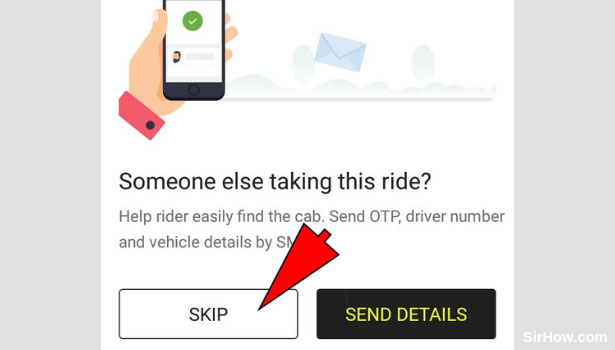
10. Tap on the option of 8 hours: As a result of skipping the previous message, you will get the following options. These options represent the time frame for the cab you have booked. Since we are specifically talking about booking an Ola cab for a full day, select the longest period. Therefore, tap on the 8-hour option given by the arrow in the picture. 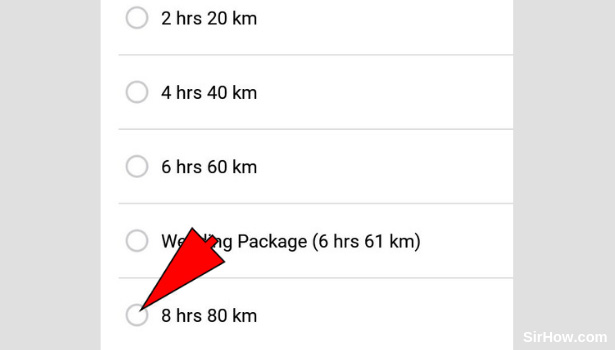
11. Select the type of cab you want: Once you select the hours of your trip, you will be redirected to the section shown below. You will be provided with a list of cabs as well as the price of the respective cab as shown in the picture. Tap on the type of cab you want to book. You can choose any of the cabs listed in this section.

12. Confirm the Booking: Once you have followed all the steps explained in this article thus far, you will get the following screen. This will include an overview of your ride, as well as other details. At the bottom of the screen, you will find the option of Accept and confirm. Tap on this option once to confirm the booking of your Ola rental for a day. 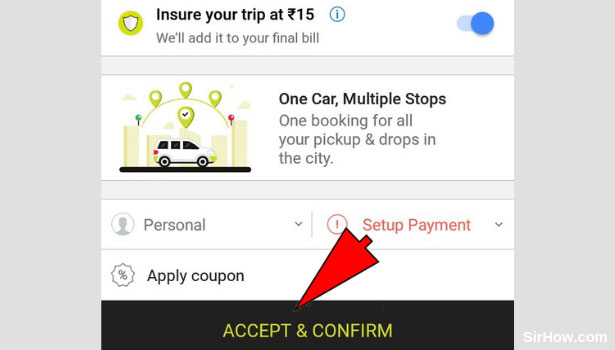
Therefore any individual user can book an Ola rental for a full day by following the steps mentioned below. The procedure is simple and easy to follow. These kinds of cabs are especially useful when you are going out on a one-day picnic with family or friends.